Graphical Network Simulator-3 is a network software emulator first released in 2008. It allows the combination of virtual and real devices, used to simulate complex networks. It uses Dynamips emulation software to simulate Cisco IOS.
GNS3 is used by many large companies including Exxon, Walmart, AT&T and NASA, and is also popular for preparation of network professional certification exams. As of 2015, the software has been downloaded 11 million times.
Install gns3-server and gns3-gui via python3-pip.
sudo aptitude install python3-pipsudo aptitude install python3-pyqt5 python3-pyqt5.qtsvgsudo pip3 install gns3-serversudo pip3 install gns3-gui
Docker support is a new feature of GNS3 version 1.5. The goal is not to simulate the deployment of a container infrastructure in production but use containers as kind of light computer replacing heavy Qemu VMs or VPCS when tools like telnet, nmap etc. are needed.
My Docker notessudo aptitude install docker.iosudo adduser cssu dockerdocker run hello-world
sudo aptitude install qemu-systemgns3
uBridge is a simple application to create user-land bridges between various technologies. Currently bridging between UDP tunnels, Ethernet and TAP interfaces is supported. Packet capture is also supported.
sudo aptitude install build-essential libpcap-devgit clone git://github.com/GNS3/ubridge.gitcd ubridgemakesudo make installchmod +x ubridge cp ubridge /usr/local/bin setcap cap_net_admin,cap_net_raw=ep /usr/local/bin/ubridge make: setcap: Command not found Makefile:82: recipe for target 'install' failed make: *** [install] Error 127sudo aptitude install libcap2-binsudo make installchmod +x ubridge cp ubridge /usr/local/bin setcap cap_net_admin,cap_net_raw=ep /usr/local/bin/ubridge
Here are the main settings that we have modified.
Set font size and enable scrollbar.
xlsfontsxterm -fn 10x20 -sb -rightbar -T "%d" -e "telnet %h %p"
cat /etc/default/grub... GRUB_CMDLINE_LINUX="console=tty0 console=ttyS0,19200n8 net.ifnames=0 biosdevname=0" ... GRUB_TERMINAL=serial GRUB_SERIAL_COMMAND="serial --speed=19200 --unit=0 --word=8 --parity=no --stop=1" ...sudo update-grubdiff /etc/inittab /etc/inittab.orig55,59c55,59 < #2:23:respawn:/sbin/getty 38400 tty2 < #3:23:respawn:/sbin/getty 38400 tty3 < #4:23:respawn:/sbin/getty 38400 tty4 < #5:23:respawn:/sbin/getty 38400 tty5 < #6:23:respawn:/sbin/getty 38400 tty6 --- > 2:23:respawn:/sbin/getty 38400 tty2 > 3:23:respawn:/sbin/getty 38400 tty3 > 4:23:respawn:/sbin/getty 38400 tty4 > 5:23:respawn:/sbin/getty 38400 tty5 > 6:23:respawn:/sbin/getty 38400 tty6 63c63 < T0:23:respawn:/sbin/getty -L ttyS0 19200 vt100 --- > #T0:23:respawn:/sbin/getty -L ttyS0 9600 vt100sudo aptitude install xfonts-base xfonts-wqy xfonts-100dpi xfonts-75dpi
diff /etc/inittab /etc/inittab.orig55,59c55,59 < #2:23:respawn:/sbin/getty 38400 tty2 < #3:23:respawn:/sbin/getty 38400 tty3 < #4:23:respawn:/sbin/getty 38400 tty4 < #5:23:respawn:/sbin/getty 38400 tty5 < #6:23:respawn:/sbin/getty 38400 tty6 --- > 2:23:respawn:/sbin/getty 38400 tty2 > 3:23:respawn:/sbin/getty 38400 tty3 > 4:23:respawn:/sbin/getty 38400 tty4 > 5:23:respawn:/sbin/getty 38400 tty5 > 6:23:respawn:/sbin/getty 38400 tty6 63c63 < T0:23:respawn:/sbin/getty --autologin cloud -L ttyS0 19200 vt100 --- > #T0:23:respawn:/sbin/getty -L ttyS0 9600 vt100
sudo cat /etc/sudoers... cloud ALL=(ALL) NOPASSWD:ALL ...
/usr/bin/qemu-system-x86_64 -name Debian-Stretch-2 -m 512M -smp cpus=1 -enable-kvm -boot order=c \
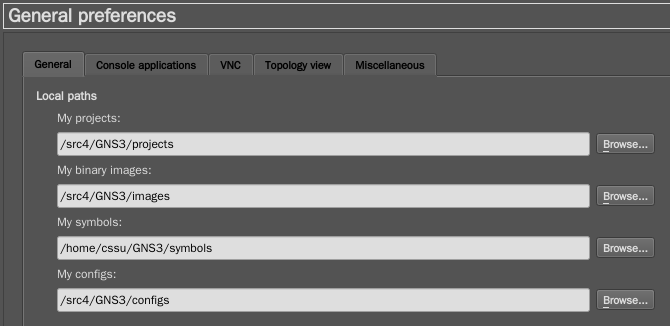
-drive file=/src4/GNS3/projects/NAT/project-files/qemu/ee2132ea-41cf-429d-88e0-3a65dc8a2ad5/hda_disk.qcow2,if=virtio,index=0,media=disk \
-serial telnet:127.0.0.1:2001,server,nowait \
-monitor tcp:127.0.0.1:56186,server,nowait -net none \
-device virtio-net-pci,mac=00:00:ab:2a:d5:00,netdev=gns3-0 \
-netdev socket,id=gns3-0,udp=127.0.0.1:10000,localaddr=127.0.0.1:10003 \
-nographic
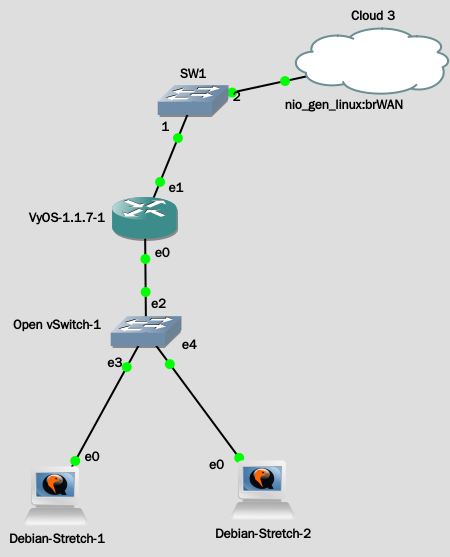
show interfacesethernet eth1 { address 192.168.0.254/24 duplex auto hw-id 00:00:ab:c7:80:00 smp_affinity auto speed auto } ethernet eth2 { address 140.120.15.180/26 duplex auto hw-id 00:00:ab:c7:80:01 smp_affinity auto speed auto }
Redirect public IP address INSIDE private IP.
show nat destinationrule 80 { description http destination { address MY-Public-IP-Addr port 80 } inbound-interface any] protocol tcp translation { address 192.168.0.1 } }
Allow private IP to access Internet.
show nat sourcerule 1 { description toWAN destination { } outbound-interface eth2 source { address 192.168.0.0/24 } translation { address masquerade } }
A typical problem with using NAT and hosting public servers is the ability for internal systems to reach an internal server using it's external IP address. The solution to this is usually the use of split-DNS to correctly point host systems to the internal address when requests are made internally. Because many smaller networks lack DNS infrastructure, a work-around is commonly deployed to facilitate the traffic by NATing the request from internal hosts to the source address of the internal interface on the firewall. This technique is commonly reffered to as NAT Reflection, or Hairpin NAT.
show nat source rule 2rule 2 { description "NAT Reflection: INSIDE" destination { address 192.168.0.0/24 } outbound-interface eth1 source { address 192.168.0.0/24 } translation { address masquerade } }