Many cloud computing use cases require persistent remote storage. Storage
solutions are often divided into three categories: object storage, block storage, and
file storage.
Note that some storage solutions support multiple categories. For example,
NexentaStor supports both block storage and file storage (with announcements for
future support for object storage), GlusterFS supports file storage and object
storage, and Ceph Storage supports object storage, block storage, and file storage.
In OpenStack: Object Storage service (Swift)
Related concepts: Amazon S3, Rackspace
Cloud Files, Ceph Storage
With object storage, files are exposed through
an HTTP interface, typically with a REST API. All client data access is done at
the user level: the operating system is unaware of the presence of the remote
storage system. In OpenStack, the Object Storage service provides this type of
functionality. Users access and modify files by making HTTP requests. Because the
data accesss interface provided by an object storage system is at a low level of
abstraction, people often build on top of object storage to build file-based
applications that provide a higher level of abstraction. For example, the OpenStack
Image service can be configured to use the Object Storage service as a backend.
Another use for object storage solutions is as a content delivery network (CDN) for
hosting static web content (e.g., images, and media files), since object storage
already provides an HTTP interface.
In OpenStack: Volumes (nova-volume service)
Relatd concepts: Amazon Elastic Block Store (EBS),
Ceph RADOS Block Device (RBD), iSCSI
With block storage, files are exposed through a
low-level computer bus interface such as SCSI or ATA, that is accessible over the
network. Block storage is synonymous with SAN (storage area network). Clients access
data through the operating system at the device level: users access the data by
mounting the remote device in a similar manner to how they would mount a local,
physical disk (e.g., using the "mount" command in Linux). In OpenStack, the
nova-volume service that forms part of
the Compute service provides this type of functionality, and uses iSCSI to expose
remote data as a SCSI disk that is attached to the network.
Because the data is exposed as a physical device, the end-user is responsible for
creating partitions and formatting the exposed disk device. In addition, in
OpenStack Compute a device can only be attached to one server at a time, so block
storage cannot be used for to share data across virtual machine instances
concurrently.
In OpenStack: none
Related concepts: NFS, Samba/CIFS, GlusterFS, Dropbox,
Google Drive
With file storage, files are exposed through a
distributed file system protocol. Filesystem storage is synonymous with NAS (network
attached storage). Clients access data through the operating system at the file
system level: users access the data by mounting a remote file system. Examples of
file storage include NFS and GlusterFS. The operating system needs to have the
appropriate client software installed to be able to access the remote file system.
Currently, OpenStack Compute does not have any native support for this type of
file storage inside of an instance. However, there is a
Gluster storage connector for OpenStack that enables the use of the
GlusterFS file system as a back-end for the Image service.
I've recently posted several articles about the advantages of
running network functions on virtualized commodity servers, and while
it's important to make the general case for replacing purpose-built
hardware appliances with commodity servers, there's a more focused story
centered around CDNs that's worth telling.
It involves a slight change in perspective. Rather than view a CDN as
one of many services that can be deployed on a virtualized platform-in
an earlier article
I talked about a spectrum of services ranging from BRAS to CDN-think of the
CDN as the platform on which an important subset of network functions
are deployed... those related to content delivery. Virtual machines are an
enabling technology, but the important point is that a CDN serves as the
cornerstone for a rich collection of functions that enable network
operators to sell web acceleration solutions to their business and
enterprise customers.
In other words, it's fair to view a CDN as a platform that hosts
functions to accelerate B2C and B2B transactions over the Internet,
especially transactions that involve cloud-based services. In this
scenario, the CDN runs at the edge of the operator's network, where in
addition to caching static objects, it also hosts client-facing and
cloud-facing optimizations. The client-facing optimizations, often
collectively called front-end optimization, include an
assortment of techniques aimed at reducing transaction response time, as
well as SSL termination, TCP enhancements for mobile applications, and
business logic offload. The cloud-facing optimizations, sometimes called
WAN acceleration, include symmetric strategies for compression
and de-duplication. (It is notable that these latter techniques are
typically symmetric because the CDN provides a point-of-presence both in
the data center and at the edge of the network.)
An architecture for CDN-as-a-Platform has two major elements. The
first is edge service nodes that not only cache static objects, but also
run a policy engine that governs how the CDN interacts with clients
that make requests and public/private clouds that host business
services. This policy engine receives and processes client HTTP
requests, dispatches the request to the appropriate module for
processing, and when communication with the data center is required
(e.g., to satisfy cache misses or to access dynamic state), selects the
appropriate module to optimize communication with those servers. In
Verivue's case, some of these modules are part of the OneVantage product
portfolio (some run their own VMs and others are cache plug-ins), while
others are provided by third-party service venders (these are typically
isolated in their own VMs).
The second element of the CDN-as-a-Platform architecture is the
lynchpin - a unified approach to service management. The management
suite is responsible for provisioning virtual machines, configuring the
services deployed in those virtual machines, proactively monitoring the
deployment, and collecting traffic logs for billing and analytics. The
core of the management suite is a data model that presents operators
with a comprehensive and coherent picture of the available network
functions that they must manage.
A clear understanding of this data model is starting to emerge.
It includes objects that model the central stake-holders, including CDN
Operators, Service Providers, and Content Providers (i.e., business
customers); objects that model the deployed infrastructure, including
virtual/physical nodes and network interfaces; objects that model the
set of services and modules instantiated on that infrastructure; and
objects that model the set of policy directives that govern how those
services and modules behave.
These rules and policies, in turn, include: (1) routing directives
that govern how end-users are routed to the best service node to process
a given request, (2) delivery directives that govern how the selected
service node delivers the resources named in the request, (3) anchor
directives that govern how the service node interacts with cloud-hosted
business services that anchor the request, and (4) analytic directives
that govern how the service node gathers and processes traffic
statistics. In other words, these rules collectively control what
service node is selected to serve a given end-user, what module(s) are
invoked at that node to customize delivery for that particular user, how
those modules are parameterized to serve a particular end-user, and how
data is collected.
Coordinating these policy directives across a set of services and
modules requires a unifying abstraction that defines the scope for each
directive. We call the scope a delivery domain, and it
corresponds to the subset of URIs to which a given set of rules and
policies is to be applied. A delivery domain is represented (identified)
in one of two ways. The first is a CDN-Prefix, which corresponds to the
FQDN at the beginning of a URI; it effectively carves out a region of
the URI name space to which a set of rules and policies are to be
applied. The second is a URI-Filter, which is given by a regular
expression; it effectively identifies a subset of URIs belonging to a
CDN-Prefix that is to be treated in a uniform way.
In summary, a CDN-powered platform allows business and enterprise
customers to accelerate their cloud-hosted web services by effectively
extending the cloud from the data center out to the edge of the
operator's network. Service nodes deployed at the network edge provide
the optimal vantage point to co-locate caching, front-end optimization,
and WAN acceleration technologies, where the management suite plays a
central role in coordinating the resulting data center-to-edge cloud on
behalf of B2C and B2B customers.
Here's a modest insight. When designing a cloud storage system,
there is value in decoupling the system's archival capacity (its
ability to persistently store large volumes of data) from the system's
delivery capacity (its ability to deliver popular objects to a scalable
number of users). The archival half need not support scalable
performance, and likewise, the delivery half need not guarantee
persistence.
In practical terms, this translates into an end-to-end storage
solution that includes a high-capacity and highly resilient object store
in the data center, augmented with caches throughout the network to
take advantage of aggregated delivery bandwidth from edge sites. This is
similar to what Amazon offers today: S3 implements a resilient object
store in the data center, augmented with CloudFront to scale delivery
through a distributed set of edge caches.
The object store runs in the data center, ingests data from some
upstream source (e.g., video prepared using a Content Management
System), and delivers it to users via edge caches. The ingest interface
is push-based and likely includes one or more popular APIs (e.g., FTP,
WebDAV, S3), while the delivery interface is pull-based and corresponds
to HTTP GET requests from the CDN.
In past articles I have written extensively about how to architect a
CDN that can be deployed throughout an operator network, claiming that a
well-designed CDN should be agnostic as to the source of content. But
it is increasingly the case that content delivered over a CDN is sourced
from a data center as part of a cloud-based storage solution. This begs
the question: is there anything we can learn by looking at storage from
such an end-to-end perspective?
I see three points worth making, although in way of a disclaimer, I'm
starting from the perspective of the CDN, and looking back to what I'd
like to see from a data center based object store. The way I see it,
though, there's more value in storing data if you have a good approach
to distributing it to users that want to access it.
First, it makes little sense to build an object store using
traditional SAN or NAS technology. This is for two reasons. One has to
do with providing the right level of abstraction. In this case, the CDN
running at the network edge is perfectly capable of dealing with a large
set of objects, meaning there is no value in managing those objects
with full file system semantics (i.e., NAS is a bad fit). Similarly, the
storage system needs to understand complete objects and not just blocks
(i.e., SAN is not a good fit). The second reason is related to cost. It
is simply more cost effective to build a scalable object store from
commodity components. This argument is well understood, and leverages
the ability to achieve scalable performance and resiliency in software.
Second, a general-purpose CDN that is able to deliver a wide range of
content-from software updates to video, from large files to small
objects, from live (linear) streams to on-demand video, from
over-the-top to managed video-should not be handicapped by an object
store that isn't equally flexible. In particular, it is important that
the ingest function be low-latency and redundant, so it is possible to
deliver both on-demand and live video. (Even live video needs to be
staged through an object store to support time shifting.)
Third, it is not practical to achieve scalable delivery from a data
center. Data centers typically provide massive internal bandwidth,
making it possible to build scalable storage from commodity servers, but
Internet-facing bandwidth is generally limited. This is just repeating
the argument in favor of delivering content via a CDN-scalable delivery
is best achieved from the edge.
About Larry Peterson
As Chief Scientist, Larry Peterson provides technical leadership
and expertise for research and development projects. He is also the
Robert E. Kahn Professor of Computer Science at Princeton University,
where he served as Chairman of the Computer Science Department from
2003-2009. He also serves as Director of the PlanetLab Consortium, a
collection of academic, industrial, and government institutions
cooperating to design and evaluate next-generation network services and
architectures.
Larry has served as Editor-in-Chief of the ACM Transactions on Computer
Systems, has been on the Editorial Board for the IEEE/ACM Transactions
on Networking and the IEEE Journal on Select Areas in Communication and
is the co-author of the best selling networking textbook Computer
Networks: A Systems Approach. He is a member of the National Academy of
Engineering, a Fellow of the ACM and the IEEE, and the 2010 recipient of
the IEEE Kobayahi Computer and Communication Award. He received his
Ph.D. degree from Purdue University in 1985.
Ceph: Open Source Storage
As the size and performance requirements of storage systems have increased,
file system designers have looked to new architectures to facilitate system
scalability. Ceph's architecture consists of an object storage, block storage and
a POSIX-compliant file system. It's in the most significant storage system that has
been accepted into the Linux kernel. Ceph has both kernel and userland
implementations. The CRUSH algorithm controlled, scalable, decentralized placement
of replicated data. In addition, it has a fully leveraged, highly scalable metadata
layer. Ceph offers compatibility with S3, Swift and Google Storage and is a drop in
replacement for HDFS (and other File Systems).
Ceph is unique because it's massively scalable to the exabyte level. The storage
system is self-managing and self-healing which means limited system administrator
involvement. It runs on commodity hardware, has no single point of failure,
leverages an intelligent storage node system and it open source.
(Source Origin:) A Ceph
system is built on industry-standard servers and consists of nodes which handle
either file-based, block, or SAN-based or object-based storage. A Ceph cluster
consists of a portable operating system interface
(POSIX)-compliant file system,
storage nodes, a metadata server daemon (or computer program), and monitor daemons
that track the state of the cluster and the nodes in the cluster. Ceph uses an
algorithm called CRUSH (controlled scalable decentralized placement of replicated
data) to define where objects store data in the cluster and also track modified
content for placement on the appropriate media.
Ceph can also be deployed as a block-based storage system. In this configuration, Ceph
is mounted as a thin-provisioned block device. When data is written to Ceph, it is
automatically striped and replicated across the cluster. The Ceph RADOS Block Device
(RDB) works with KVM and supports the import and export of virtual machine images and
provides snapshot capability.
The system can also serve as a file system where it maps the directories and file names
of the file system to objects stored in RADOS clusters. The size of these clusters can
be expanded or contracted and the workload is automatically rebalanced.
Like file system clusters such as Gluster and Lustre, Ceph is scalable to multiple
exabytes of data. Ceph is included in the Linux kernel and integrated into the
OpenStack project.
Because, like other open source projects, Ceph can be difficult to install, configure,
and maintain, Inktank became the official sponsor of Ceph and will provide not only
installation and configuration, performance testing, and infrastructure assessment
services, but support for Ceph itself. The company has developed a community for Ceph
users where they can chat about Ceph implementation and other issues.
Ceph was designed by Sage Weil, CEO and founder of Inktank, as part of a PhD thesis at
the University of California at Santa Cruz. Weil released Ceph into the open source
community in 1997. Weil is also a co-founder of DreamHost, the hosting company that
developed Ceph and spun it off to Inktank.
Ceph is named after the UC
Santa Cruz mascot, Sammy, a banana slug mollusk. Ceph is short for cephalopods, a class
of mollusks. Since nearly all mollusks release ink, it's likely that Inktank's name
also derives from UC Santa Cruz's mascot.
Summary: Linux continues to invade the scalable computing
space and, in particular, the scalable storage space. A recent addition to Linux's
impressive selection of file systems is Ceph, a distributed file system that
incorporates replication and fault tolerance while maintaining POSIX
compatibility. Explore the architecture of Ceph and learn how it provides
fault tolerance and simplifies the management of massive amounts of
data.
Intro.
As an architect in the storage industry, I have an affinity to file
systems. These systems are the user interfaces to storage systems, and
although they all tend to offer a similar set of features, they also can
provide notably different features. Ceph is no different, and it offers
some of the most interesting features you'll find in a file system.
Ceph began as a PhD research project in storage systems by Sage Weil at the
University of California, Santa Cruz (UCSC). But as of late March 2010,
you can now find Ceph in the mainline Linux kernel (since 2.6.34).
Although Ceph may not be ready for production environments, it's still
useful for evaluation purposes. This article explores the Ceph file system
and the unique features that make it an attractive alternative for
scalable distributed storage.
Why "Ceph"?
"Ceph" is an odd name for a file system and breaks the typical acronym trend that
most follow. The name is a reference to the mascot at UCSC (Ceph's origin), which
happens to be "Sammy," the banana slug, a shell-less mollusk in the cephalopods
class. Cephalopods, with their multiple tentacles, provide a great metaphor for a
distributed file system.
Developing a distributed file system is a complex endeavor, but it's immensely
valuable if the right problems are solved. Ceph's goals can be simply defined
as:
Easy scalability to multi-petabyte capacity
High performance over varying workloads (input/output operations per
second [IOPS] and bandwidth)
Strong reliability
Unfortunately, these goals can compete with one another (for example,
scalability can reduce or inhibit performance or impact reliability). Ceph
has developed some very interesting concepts (such as dynamic metadata
partitioning and data distribution and replication), which this article
explores shortly. Ceph's design also incorporates fault-tolerance features
to protect against single points of failure, with the assumption that
storage failures on a large scale (petabytes of storage) will be the norm
rather than the exception. Finally, its design does not assume particular
workloads but includes the ability to adapt to changing distributed
workloads to provide the best performance. It does all of this with the
goal of POSIX compatibility, allowing it to be transparently deployed for
existing applications that rely on POSIX semantics (through Ceph-proposed
enhancements). Finally, Ceph is open source distributed storage and part
of the mainline Linux kernel (2.6.34).
Now, let's explore the Ceph architecture and its core elements at a high
level. I then dig down another level to identify some of the key aspects
of Ceph to provide a more detailed exploration.
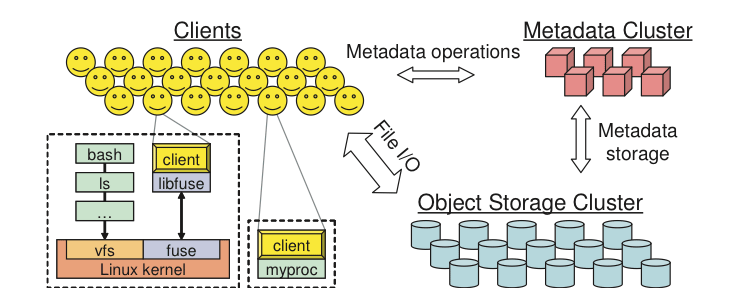
The Ceph ecosystem can be broadly divided into four segments (see Figure
1): clients (users of the data), metadata servers (which cache and
synchronize the distributed metadata), an object storage cluster (which
stores both data and metadata as objects and implements other key
responsibilities), and finally the cluster monitors (which implement the
monitoring functions).
As Figure 1 shows, clients perform metadata operations (to identify the
location of data) using the metadata servers. The metadata servers manage
the location of data and also where to store new data. Note that metadata
is stored in the storage cluster (as indicated by "Metadata I/O"). Actual
file I/O occurs between the client and object storage cluster. In this
way, higher-level POSIX functions (such as open, close, and rename) are
managed through the metadata servers, whereas POSIX functions (such as read
and write) are managed directly through the object storage cluster.
Another perspective of the architecture is provided in Figure 2. A set of
servers access the Ceph ecosystem through a client
interface, which understands the relationship between metadata servers and
object-level storage. The distributed storage system can be viewed in a
few layers, including a format for the storage devices (the Extent and
B-tree-based Object File System [EBOFS] or an alternative) and an
overriding management layer designed to manage data replication, failure
detection, and recovery and subsequent data migration called Reliable
Autonomic Distributed Object Storage (RADOS). Finally, monitors
are used to identify component failures, including subsequent
notification.
With the conceptual architecture of Ceph under your belts, you can dig down
another level to see the major components implemented within the Ceph
ecosystem. One of the key differences between Ceph and traditional file
systems is that rather than focusing the intelligence in the file system
itself, the intelligence is distributed around the ecosystem.
Figure 3
shows a simple Ceph ecosystem. The
Ceph Client is the user of the Ceph file system. The Ceph Metadata Daemon
provides the metadata services, while the Ceph Object Storage Daemon
provides the actual storage (for both data and metadata). Finally, the
Ceph Monitor provides cluster management. Note that there can be many Ceph
clients, many object storage endpoints, numerous metadata servers
(depending on the capacity of the file system), and at least a redundant
pair of monitors. So, how is this file system distributed?
Early versions of Ceph utilized Filesystems in User SpacE (FUSE), which
pushes the file system into user space and can greatly simplify its
development. But today, Ceph has been integrated into the mainline
kernel, making it faster, because user space context switches are no
longer necessary for file system I/O.
As Linux presents a common interface to the file systems (through the
virtual file system switch [VFS]), the user's perspective of Ceph is
transparent. The administrator's perspective will certainly differ, given
the potential for many servers encompassing the storage system (see the
Resources section for information on creating a
Ceph cluster). From the users' point of view, they have access to a large
storage system and are not aware of the underlying metadata servers,
monitors, and individual object storage devices that aggregate into a
massive storage pool. Users simply see a mount point, from which
standard file I/O can be performed.
The Ceph file system - or at least the client interface - is
implemented in the Linux kernel. Note that in the vast majority of file
systems, all of the control and intelligence is implemented within the
kernel's file system source itself. But with Ceph, the file system's
intelligence is distributed across the nodes, which simplifies the client
interface but also provides Ceph with the ability to massively scale (even
dynamically).
Rather than rely on allocation lists (metadata to map blocks on a disk to a
given file), Ceph uses an interesting alternative. A file from the Linux
perspective is assigned an inode number (INO) from the metadata server,
which is a unique identifier for the file. The file is then carved into
some number of objects (based on the size of the file). Using the INO and
the object number (ONO), each object is assigned an object ID (OID). Using
a simple hash over the OID, each object is assigned to a placement group.
The placement group (identified as a PGID) is a conceptual
container for objects. Finally, the mapping of the placement group to
object storage devices is a pseudo-random mapping using an algorithm called
Controlled Replication Under Scalable Hashing (CRUSH). In
this way, mapping of placement groups (and replicas) to storage devices
does not rely on any metadata but instead on a pseudo-random mapping function.
This behavior is ideal, because it minimizes the overhead of storage and
simplifies the distribution and lookup of data.
The final component for allocation is the cluster map. The cluster
map is an efficient representation of the devices representing
the storage cluster. With a PGID and the cluster map, you can locate any
object.
The job of the metadata server (cmds) is to manage the file system's
namespace. Although both metadata and data are stored in the object
storage cluster, they are managed separately to support scalability. In
fact, metadata is further split among a cluster of metadata servers that
can adaptively replicate and distribute the namespace to avoid hot spots.
As shown in Figure 4, the metadata servers manage portions of the
namespace and can overlap (for redundancy and also for performance). The
mapping of metadata servers to namespace is performed in Ceph using
dynamic subtree partitioning, which allows Ceph to adapt to changing
workloads (migrating namespaces between metadata servers) while preserving
locality for performance.
But because each metadata server simply manages the namespace for the
population of clients, its primary application is an intelligent metadata
cache (because actual metadata is eventually stored within the object
storage cluster). Metadata to write is cached in a short-term journal,
which eventually is pushed to physical storage. This behavior allows the
metadata server to serve recent metadata back to clients (which is common
in metadata operations). The journal is also useful for failure recovery:
if the metadata server fails, its journal can be replayed to ensure
that metadata is safely stored on disk.
Metadata servers manage the inode space, converting file names to metadata.
The metadata server transforms the file name into an inode, file size, and
striping data (layout) that the Ceph client uses for file I/O.
Ceph includes monitors that implement management of the cluster map, but
some elements of fault management are implemented in the
object store itself. When object storage devices fail or new devices are
added, monitors detect and maintain a valid cluster map. This function is
performed in a distributed fashion where map updates are communicated with
existing traffic. Ceph uses Paxos, which is a family of algorithms for
distributed consensus.
Similar to traditional object storage, Ceph storage nodes include not only
storage but also intelligence. Traditional drives are simple targets that
only respond to commands from initiators. But object storage devices are
intelligent devices that act as both targets and initiators to support
communication and collaboration with other object storage devices.
From a storage perspective, Ceph object storage devices perform the mapping
of objects to blocks (a task traditionally done at the file system layer
in the client). This behavior allows the local entity to best decide how
to store an object. Early versions of Ceph implemented a custom low-level
file system on the local storage called EBOFS. This system
implemented a nonstandard interface to the underlying storage tuned for
object semantics and other features (such as asynchronous notification of
commits to disk). Today, the B-tree file system (BTRFS) can be used at the
storage nodes, which already implements some of the necessary features
(such as embedded integrity).
Because the Ceph clients implement CRUSH and do not have knowledge of the
block mapping of files on the disks, the underlying storage devices can
safely manage the mapping of objects to blocks. This allows the storage
nodes to replicate data (when a device is found to have failed).
Distributing the failure recovery also allows the storage system to scale,
because failure detection and recovery are distributed across the
ecosystem. Ceph calls this RADOS (see Figure 3).
As if the dynamic and adaptive nature of the file system weren't enough,
Ceph also implements some interesting features visible to the user. Users
can create snapshots, for example, in Ceph on any subdirectory (including
all of the contents). It's also possible to perform file and capacity
accounting at the subdirectory level, which reports the storage size and
number of files for a given subdirectory (and all of its nested contents).
Although Ceph is now integrated into the mainline Linux kernel, it's
properly noted there as experimental. File systems in this state are
useful to evaluate but are not yet ready for production environments. But
given Ceph's adoption into the Linux kernel and the motivation by its
originators to continue its development, it should be available soon to
solve your massive storage needs.
Ceph isn't unique in the distributed file system space, but it is unique in
the way that it manages a large storage ecosystem. Other examples of
distributed file systems include the Google File System (GFS), the General
Parallel File System (GPFS), and Lustre, to name just a few. The ideas
behind Ceph appear to offer an interesting future for distributed file
systems, as massive scales introduce unique challenges to the massive
storage problem.
Ceph is not only a file system
but an object storage ecosystem with enterprise-class features. In the
Resources section, you'll find information on
how to set up a simple Ceph cluster (including metadata servers, object
servers, and monitors). Ceph fills a gap in distributed storage, and it
will be interesting to see how the open source offering evolves in the
future.
"The Ceph filesystem" on LWN.net
provides an early take on the Ceph file system (including a set of entertaining
comments).
"Building a
Small Ceph Cluster gives instructions for building a Ceph cluster along with
tips for distribution of assets. This article walks you through getting the Ceph
source, building a new kernel, and then deploying the various elements of the
Ceph ecosystem.
At the Paxos Wikipedia
page, learn more about how Ceph metadata servers utilize Paxos as a consensus
protocol among the distributed entities.
In "Anatomy of the Linux virtual file system switch"
(developerWorks, August 2009), learn more about the VFS, a flexible mechanism that
Linux includes to allow multiple file systems to exist concurrently.
In "Next-generation
Linux file systems: NiLFS(2) and exofs" (developerWorks, October 2009), learn
more about exofs, another Linux file system that utilizes object storage. exofs
maps object storage device-based storage into a traditional Linux file
system.
Watch
developerWorks
on-demand demos ranging from product installation and setup demos for beginners,
to advanced functionality for experienced developers.
Evaluate IBM
products in the way that suits you best: Download a product trial, try a
product online, use a product in a cloud environment, or spend a few
hours in the
SOA
Sandbox learning how to implement Service Oriented Architecture efficiently.
Discuss
Get involved in the My
developerWorks community. Connect with other developerWorks users while
exploring the developer-driven blogs, forums, groups, and wikis.
M. Tim Jones is an embedded firmware architect and the
author of Artificial Intelligence: A Systems Approach, GNU/Linux Application
Programming (now in its second edition), AI Application Programming
(in its second edition), and BSD Sockets Programming from a Multilanguage
Perspective. His engineering background ranges from the development of kernels
for geosynchronous spacecraft to embedded systems architecture and networking
protocols development. Tim is a Consultant Engineer for Emulex Corp. in Longmont,
Colorado.
Scalable storage is a key component in cloud environments. RADOS and Ceph
enter the field, promising to support seamlessly scalable storage.
Cloud computing is, without a doubt, the IT topic of our time. No
issue pushes infrastructure managers with large-scale enterprises as
hard as how to best implement the cloud. The IaaS principle is quite
simple: The goal is to provide capacity to users in the form of
computational power and storage in a way that means as little work as
possible for the user and that keeps the entire platform as flexible as
possible.
Put more tangibly, this means customers can request CPU
cycles and disk space as they see fit and continue to use both as the
corresponding services are needed. For IT service providers, this means
defining your own setup to be as scalable as possible: It should be
possible to accommodate peak loads without difficulty, and if the
platform grows - which will be the objective of practically any
enterprise - a permanent extension should also be accomplished easily.
In
practical terms, implementing this kind of solution will tend to be
more complex. Scalable virtualization environments are something that is
easy to achieve: Xen and KVM, in combination with the current crop of
management tools, make it easy to manage virtualization hosts. Scale out
also is no longer an issue: If the platform needs more computational
performance, you can add more machines that integrate seamlessly with
the existing infrastructure.
Things start to become more
interesting when you look at storage. The way IT environments store data
has remained virtually unchanged in the past few years. In the early
1990s, data centers comprised many servers with local storage, all of
which suffered from legacy single points of failure. As of the
mid-1990s, Fibre Channel HBAs and matching SAN storage entered the
scene, offering far more redundancy than their predecessors, but at a
far higher price. People who preferred a lower budget approach turned to
DRBD with standard hardware
a few years ago, thus avoiding what can be hugely expensive SANs. However, all
of these approaches share a problem: They do not scale out seamlessly.
Scale Out and Scale Up
Admins
and IT managers distinguish between two basic types of scalability.
Vertical scalability (scale up) is based on the idea of extending the
resources of existing devices, whereas horizontal scalability (scale
out) relies on adding more resources to the existing set (Figure 1).
Databases are a classic example of a scale-out solution: Typically,
slave servers are added to support load distribution.
Figure 1: Two kinds of scalability.
Scale out is completely new ground when it comes to storage.
Local storage in servers, SAN storage, or servers with DRBD will
typically only scale vertically (more disks!), not horizontally. When
the case is full, you need a second storage device, and this will not
typically support integration with the existing storage to provide a
single unit, thus making maintenance far more difficult. In terms of SAN
storage, two SANs just cost twice as much as one.
If you are planning a cloud and thinking about seamlessly scalable
storage, don't become despondent at this point: Authors of the popular
cloud applications are fully aware of this problem and now offer
workable solutions known as object stores.
Object stores follow a
simple principle: All servers that become part of an object store run
software that manages and exports the server's local disk space. All
instances of this software collaborate on the cluster, thus providing
the illusion of a single, large data store. To support internal storage
management, the object store software does not save data in its original
format on the individual storage nodes, but as binary objects. Most
exciting is that the number of individual nodes joining forces to create
the large object store is arbitrary. You can even add storage nodes on
the fly.
Because the object storage software also has internal
mechanisms to handle redundancy, and the whole thing works with standard
hardware, a solution of this kind combines the benefits of SANs or DRBD
storage and seamless horizontal scalability. RADOS has set out to be
the king of the hill in this sector, in combination with the matching
Ceph filesystem.
How RADOS Works
RADOS (reliable autonomic distributed object store, although many people
mistakenly say "autonomous") has been under development at DreamHost, led by
Sage A. Weil, for a number of years and is basically the result of a doctoral
thesis at the University of California, Santa Cruz. RADOS implements
precisely the functionality of an object store as described earlier,
distinguishing between three different layers to do so:
Object Storage Devices (OSDs). An OSD in RADOS is always a folder
within an existing filesystem. All OSDs together form the object store
proper, and the binary objects that RADOS generates from the files to be
stored reside in the store. The hierarchy within the OSDs is flat:
files with UUID-style names but no subfolders.
Monitoring servers (MONs): MONs form the interface to the RADOS
store and support access to the objects within the store. They handle
communication with all external applications and work in a decentralized
way: There are no restrictions in terms of numbers, and any client can
talk to any MON. MONs manage the MONmap (a list of all MONs) and the
OSDmap (a list of all OSDs). The information from these two lists lets
clients compute which OSD they need to contact to access a specific
file. In the style of a
Paxos
cluster, MONs also ensure RADOS's functionality in terms of respecting
quorum
rules.
Metadata servers (MDS): MDSs provide POSIX metadata for objects in the
RADOS object store for Ceph clients.
What About Ceph?
Most articles about RADOS just refer to Ceph in the title, causing some
confusion. Weil described the relationship between RADOS and Ceph as two parts
of the same solution: RADOS is the "lower" part and Ceph the "upper" part. One
thing is for sure: The best looking object store in the world is useless if it
doesn't give you any options for accessing the data you store in it.
However, it is precisely these options that Ceph offers for RADOS: It is
a filesystem that accesses the object store in the background and thus
makes its data directly usable in the application. The metadata servers
help accomplish this task by providing the metadata required for each
file that Ceph accesses in line with the POSIX standard when a user
requests a file via Ceph.
Because DreamHost didn't consider until
some later stage of development that RADOS could be used as a back end
for tools other than filesystems, they generated confusion regarding the
names of RADOS and Ceph. For example, the official DreamHost guides
refer simply to "Ceph" when they actually mean "RADOS and Ceph."
First RADOS Setup
Theory is one thing, but to gain some understanding of RADOS and Ceph,
it makes much more sense to experiment on a "live object." You don't need
much for a complete RADOS-Ceph setup: Three servers with local storage
will do fine. Why three? Remember that RADOS autonomically provides a
high-availability option. The MONs use the PAXOS implementation referred
to earlier to guarantee that there will always be more than one copy of
an object in a RADOS cluster. Although you could turn a single node
into a RADOS store, this wouldn't give you much in the line of high
availability. A RADOS cluster comprising two nodes is even more
critical: In a normal case, the cluster would have a quorum, but the
failure of a single node would then make the other node useless because
RADOS needs a quorum, and by definition, one can't make a quorum. In
other words, you need three nodes to be on the safe side, so the failure
of single node won't be an issue.
Incidentally, nothing can stop
you from using virtual machines with RADOS for your experiments - RADOS
doesn't have any functions that require specific hardware features.
Finding the Software
Before experimenting, you need to install RADOS and Ceph. Ceph, which is
a plain vanilla filesystem driver on Linux systems (e.g., ext3 or ext4),
made its way into the Linux kernel in Linux 2.6.34 and is thus available
for any distribution with this or a later kernel version (Figure 2).
The situation isn't quite as easy with RADOS; however, the
documentation points to prebuilt packages, or at least gives
you an installation guide, for all of the popular distributions. Note that although
the documentation refers to "ceph," the packages contain all of the
components you need for RADOS. After installing the packages, it's time
to prepare RADOS.
Figure 2: After loading the ceph kernel module, the filesystem is available
on Linux. Ceph was first introduced in kernel 2.6.34.
Preparing the OSDs
RADOS needs OSDs. As I mentioned earlier, any folder on a filesystem can act as
an OSD; however, the filesystem must support extended attributes. The RADOS authors
recommend Btrfs but also mention XFS as an alternative for anyone who is still a bit
wary of using Btrfs. For simplicity's sake, I will assume in the following examples
that you have a directory named osd.ID in /srv on three servers, where
ID stands for the server's hostname in each case. If your three servers are
named alice, bob, and charlie, you would have a folder named
/srv/osd.alice on server alice, and so on.
If you will be using
a local filesystem set up specially for this purpose, be sure to mount it in
/srv/osd.ID. Finally, each of the hosts in /srv also needs a
mon.ID folder, where ID again stands for the hostname.
In this
sample setup, the central RADOS configuration in /etc/ceph/ceph.conf might
look like Listing 1.
Listing 1: Sample /etc/ceph/ceph.conf
[global]
   auth supported = cephx
   keyring = /etc/ceph/$name.keyring
[mon]
   mon data = /srv/mon.$id
[mds]
[osd]
   osd data = /srv/osd.$id
   osd journal = /srv/osd.$id.journal
   osd journal size = 1000
[mon.a]
   host = alice
   mon addr = 10.42.0.101:6789
[mon.b]
   host = bob
   mon addr = 10.42.0.102:6789
[mon.c]
   host = charlie
   mon addr = 10.42.0.103:6789
[osd.0]
   host = alice
[osd.1]
   host = bob
[osd.2]
   host = charlie
[mds.a]
   host = alice
The configuration file defines the following details: each of the three hosts provides an OSD and a MON server; host alice
is also running an MDS to ensure that any Ceph clients will find
POSIX-compatible metadata on access. Authentication between the nodes is
encrypted: The keyring for this is stored in the /etc/ceph folder and goes by the name of $name.keyring, where RADOS will automatically replace name with the actual value later.
Most importantly, the nodes in the RADOS cluster must reach one another directly using the hostnames from your ceph.conf file. This could mean adding these names to your /etc/hosts file. Additionally, you need to be able to log in to all of the RADOS nodes as root later on for the call to mkcephfs, and root needs to be able to call sudo
without an additional password prompt on all of the nodes. After
fulfilling these conditions, the next step is to create the keyring to
support mutual authentication between the RADOS nodes:
mkcephfs -a -c /etc/ceph/ceph.conf -k /etc/ceph/admin.keyring
Now you need to ensure that ceph.conf
exists on all the hosts belonging to the cluster (Figure 3). If this is
the case, you just need to start RADOS on all of the nodes: Typing
/etc/init.d/ceph start
will do the trick. After a couple of seconds, the three nodes should have joined the cluster; you can check this by typing
ceph -k /etc/ceph/admin.keyring -c /etc/ceph/ceph.conf health
which should give you the output shown in Figure 4.
Figure 3: To discover which Ceph services are running on a host, type ps. In this example, the host is an OSD, MON, and MDS.
Figure 4: Ceph has its own health options that tell you whether the RADOS Paxos cluster is working properly.
Using Ceph to Mount the Filesystem
To mount the newly created filesystem on another host on one of the RADOS nodes,
you can use the normal mount command - the target host is one of the MON
servers (i.e., alice in this example) with a MON address set to
10.42.0.101:6789 in ceph.conf. Because Cephx authentication is being
used, I need to identify the login credentials automatically generated by Ceph before
I can mount the filesystem. The following command on one of the RADOS nodes outputs
the credentials:
ceph-authtool -l /etc/ceph/admin.keyring
The mount
process then follows:
mount -t ceph 10.0.0.1:6789:/ /mnt/osd -vv -o name=admin,secret=mykey
where mykey needs to be replaced by the value for key that you
determined with the last command. The mountpoint in this example is /mnt/osd,
which can be used it as a normal directory from now on.
The Crush Map
RADOS and Ceph use a fair amount of magic in the background to safeguard
the setup against any kind of failure, starting with the mount. Any of the
existing MON servers can act as a mountpoint; however, this doesn't mean
communications are only channeled between the client and this one MON.
Instead, Ceph on the client receives the MON and OSDmaps from the MON
server it contacts and then references them to compute which OSD is best
to use for a specific file before going on to handle the communication
with this OSD.
The Crush map is another step for improving
redundancy. It defines which hosts belong to a RADOS cluster, how many
OSDs exist in the cluster, and how to distribute the files over these
hosts for best effect. The Crush map makes RADOS rack-aware, allowing
admins to manipulate the internal replication of RADOS in terms of
individual servers, racks, or security zones in the data center. The
setup shown for the example here also has a rudimentary default Crush
map. If you want to experiment with your own Crush map, the
Ceph wiki gives you the most important information for
getting started.
Extending the Existing Setup
How do you go about extending an existing RADOS cluster, by adding more
nodes to increase the amount of available storage? If you want to add a
node named daisy to the existing setup, the first step would be
to define an ID for this node. In this example, IDs 0 through 3 are
already assigned, and the new node would have an ID of 4, so you need to
type:
ceph osd create 4
Then you need to extend the
ceph.conf files on the existing cluster nodes, adding an entry for
daisy. On daisy, you also need to create the folder structure needed for daisy
to act as an OSD (i.e., the directories in /srv, as in the previous examples).
Next, copy the new ceph.conf to the /etc/ceph folder on daisy.
Daisy also needs to know the current MON structure - after all, she will need
to register with an existing MON later on. This means daisy needs the current
MONmap for the RADOS cluster. You can read the MONmap on one of the existing RADOS
nodes by typing
ceph mon getmap -o /tmp/monmap
(Figure 5), and then
use scp to copy it to daisy (this example assumes you are storing the MONmap
in /tmp/monmap on daisy). Now, you need to initialize the OSD directory on
daisy:
If the additional cluster node uses an ID other than 4, you need to modify
the numeric value that follows -i.
Figure 5: The MONmap contains information about MONs in the RADOS cluster. New OSDs rely on this information.
Finally, you need to introduce the existing cluster to daisy. In this example,
the last command created a /etc/ceph/osd.4.keyring file on daisy, which you
can copy to one of the existing MONs with scp. Following this,
on the same node adds the new OSD to the existing authentication structure
(Figure 6). Typing /etc/init.d/ceph on daisy launches RADOS, and the new OSD
registers with the existing RADOS cluster. The final step is to modify the existing
Crush map so the new OSD is used. In this example, you would type
to do this. The new OSD is now
part of the existing RADOS/Ceph cluster.
Figure 6: Typing "ceph auth list" tells Ceph to
reveal the keys that a MON instance already knows and what the
credentials allow the node to do.
Conclusions
It isn't difficult to set up the combination of RADOS and Ceph. But this simple
configuration doesn't leverage many of the exciting features that RADOS offers. For
example, the Crush map functionality gives you the option of deploying huge RADOS
setups over multiple racks in the data center while offering intelligent failsafes.
Because RADOS also offers you the option of dividing its storage into individual
pools of variable sizes, you can achieve more granularity in terms of different
tasks and target groups.
Also, I haven't looked at the RADOS front ends beyond Ceph. After all, Ceph
is just one front end of many; in this case, it supports access to files
in the object store via the Linux filesystem. However, more options for
accessing the data on RADOS exist. The RADOS block device, or rbd
for short, is a good choice when you need to support access to files in
the object store at the block device level. For example, this would be
the case for virtual machines that will typically accept block devices
as a back end for virtual disks, thus avoiding slower solutions with
disk images. In this way, you can exploit RADOS's potential as an
all-encompassing storage system for large virtualization solutions while
solving another problem in the context of the cloud.
Speaking of the cloud,
besides rbd, librados provides various interfaces for HTTP access -
for example, a variant compatible with Amazon's S3 and a Swift-compatible variant.
A generic REST interface is also available. As you can see, RADOS has a good
selection of interfaces to the world outside.
At the time of
writing, the RADOS Ceph components were still pre-series, but the
developers were looking to release version 1.0, which could already be
available as officially stable and "enterprise-ready."
A Basic Ceph Storage & KVM Virtualisation Tutorial
(Source Origin)
So I had been meaning to give CEPH
& KVM Virtualisation a whirl in the lab for quite some time now.
Here I have provided for you all a set of command-by-command
instructions I used for setting it up on a single host. The goal here is
really just to get it to the 'working' stage for some basic functional
experimentation.
Ideally you would want to set this up on multiple hosts with proper
network separation so you can see how it performs with real-world
attenuation.
Overview
For those who don't know it, CEPH is a distributed storage solution that
allows you to scale horizontally with multiple machines/heads instead
of the more traditional methodologies which use centralised heads with
large amounts of storage attached to them.
The principle here is that you should be able to buy lots of inexpensive
computers with a bunch of direct attached storage and just cluster them
to achieve scalability. Also, without a central point of failure or
performance bottleneck you should be able to scale beyond the
limitations of our past storage architectures.
So CEPH like most distributed storage solutions, really has 3 main components:
Object Storage Device (OSD): this is where the blocks get stored. You
would usually have lots of these.
Meta-Data Server (MDS): This where the metadata gets stored.
You would have less of these. They are used for looking up where the
blocks are stored and storing meta-data about files and blocks.
Monitor (MON): Cluster management, configuration and state. This
component keeps track of the state of the clustering really.
Here is a basic diagram provided from the official site (so yes I stole it - I
hope thats okay):
As you can see, ideally these components are meant to be ran on different sets
of systems, with the OSD component being the most frequent. I'm just going to run
them all on the same host for this demo, which is useful for a functional test, but
not for a destructive or performance test.
By the way the OSD part can used different types of backends and filesystems
for storage, but in this example I've chosen BTRFS.
So CEPH itself supports multiple different ways of mounting its storage, which
makes it quite a flexible solution.
In this demo I'm going to concentrate only on the RBD and Ceph DFS mechanisms.
This installation was tested with:
ceph 0.4.0
qemu-kvm 1.0
libvirt 0.9.8
debian 7.0 (wheezy)
I'm using the bleeding edge versions of these components because CEPH is really
in heavy development its better to see how the main-line of development works to get
a clearer picture.
OS Preparation
It was tested with real hardware hosted by Hetzner in Germany. The box specs were
roughly something like:
Quad-Core processor
16 GB of RAM
2 x 750 GB disks (no hardware raid)
To begin, I personally built a Debian 6.0 system (because thats all Hetzner
offers you within its Robot tool) with a spare partition that I later use for the
OSD/BTRFS volume. The layout was something like:
/dev/md0: /boot, 512MB
/dev/md1: LVM, 74 GB
/dev/md2: the rest of the disk
And in the LVM partition I defined the following logical volumes:
/: 50 GB (ext4)
swap: 20 GB
The device /dev/md2 I reserved for BTRFS. I believe a more optimal configuration
is to not use an MD device but just use /dev/sda2 & /dev/sda3 and let BTRFS do
the mirroring. I however have no data or performance statistics to prove this at the
moment.
To get the system upgraded from Debian 6 to 7 is fairly straight-forward. First
update the APT sources list.
/etc/apt/sources.list:
 deb http://ftp.de.debian.org/debian/ wheezy main contrib non-free
 deb http://ftp.de.debian.org/debian/ wheezy-proposed-updates main contrib non-free
Then run the following to then get the latest updates:
 $ apt-get update
 $ apt-get -y dist-upgrade
The kernel would have been upgraded so you should reboot at this point.
CEPH Installation
Install CEPH using the ceph package. This should pull in all the dependencies
you need.
$ apt-get install ceph
Create some directories for the various CEPH components:
$ mkdir -p /srv/ceph/{osd,mon,mds}
I used a configuration file like this below. Obviously you will need to change the
various parts to suit your environment. I've left out authentication in this demo for
simplicity, although if you want to do real destructive and load-testing you should
always include this.
Now for configuration, CEPH chooses to try and SSH into remote boxes and configure
things. I believe this is nice for people who are just getting started, but I'm not
sure if this is correct going forward if you already have your own Configuration
Management tool like Puppet, Puppet Docs, Chef or CFEngine TuroCFEngine.
So to begin with, there is a command that will initialise your CEPH filesystems
based on the configuration you have provided:
$ /sbin/mkcephfs -a -c /etc/ceph/ceph.conf --mkbtrfs --no-copy-conf
Starting the daemon was a little strange (see the -a switch?):
$ /etc/init.d/ceph -a start
So just to test its all working, lets mount the CEPH DFS volume onto the
local system:
$ mount -t ceph <your_hostname>:/ /mnt
What you are looking at here is the CEPH object store mounted in /mnt. This is
a shared object store - and you should be able to have multiple hosts mount it just
like NFS. As mentioned before-hand however, this is not the only way of getting
access to the CEPH storage cluster.
CEPH DFS & Directory Snapshots
So I just wanted to segway a little and talk about this neat feature.
CEPH & the ceph based mount point above has the capability to do
per-directory snapshots which could come in useful. The interface is
quite simple as well.
making a snapshot:
 $ mkdir /mnt/test
 $ cd /mnt/test
 $ touch a b c
 $ mkdir .snap/my_snapshot
deleting a snapshot:
$ rmdir .snap/my_snapshot
finding a snapshot:
The .snap directory won't show up when you do a ls -la in the dir.
Simply assume its there and do something like:
$ ls -la .snap
... in the directory and the snapshots should show up under the names you created
them with.
RADOS Block Device
So an alternative way of using your CEPH storage is by using RBD. The RBD interface
gives you the capability to expose an object onto a remote system as a block device.
Obviously this has the same caveats as any block device, so multiple hosts that mount
the same device must ensure they use some sort of clustered file system such as OCFS2.
So first if its not already, load the rbd kernel module:
$ modprobe rbd
Using the 'rbd' command line tool, create an image (size is in megs):
$ rbd create mydisk --size 10000
You can list the current images if you want:
$ rbd list
Now to mount the actually device, you just have to tell the kernel first:
QEMU (and libvirt for that matter) at some point merged in patched to
allow you to specify an 'rbd' store as a backend to a QEMU virtual
instance. I'm going to focus on using an Intel/KVM image for this
tutorial.
So lets start by installing KVM & Qemu and the various other pieces
we'll need:
And restart iptables-persistent to load the rules:
$ service iptables-persistent restart
Turn on forwarding for IPv4:
$ echo 1 > /proc/sys/net/ipv4/ip_forward
Now that the network is done, we want to create a script to help us launch our
VM instance.
First of all create a device definition file called disk.xml with the following
contents. This allows us to work-around limitations in virt-install, as it doesn't
yet support these extra options as command-line arguments.
#!/bin/bash
set -x
virt-install \
  --name=box1 \
  --ram=512 \
  --vcpus=1 \
  --location=http://ftp.de.debian.org/debian/dists/wheezy/main/installer-amd64/ \
  --extra-args="console=ttyS0" \
  --serial=pty \
  --console=pty,target_type=serial \
  --os-type=linux \
  --os-variant=debiansqueeze \
  --network=bridge=virbr0,model=virtio \
  --graphics=none \
  --virt-type=kvm \
  --noautoconsole \
  --nodisks
# This is because virt-install doesn't support passing rbd
# style disk settings yet.
# Attaching it quickly before system boot however seems to work
virsh attach-device box1 disk.xml --persistent
And finally we should be able to run it:
./virt.sh
Now attach to the console and go through the standard installation steps for
the OS.
virsh console box1
Note: There is no DHCP or DNS server setup - for this test I just
provided a static IP and used my own DNS servers.
As you go through the setup, the RBD disk we defined and created should
be available like a normal disk as you would expect. After installation
you shouldn't really notice any major functional difference.
Once installation is complete, you should be able to boot the system:
virsh start box 1
And then access the console:
# virsh console box1
Connected to domain box1
Escape character is ^]
Debian GNU/Linux 6.0 box1 ttyS0
box1 login:
And then your done.
Summary
So this is quite an interesting exercise and one worth doing, but the software is
still very much early-release. They even admit this themselves.
I'm wary of performance and stability more then anything, something I
can't test with just a single host - so if I ever get the time I'd
really like to run this thing properly.
I had a brief look at the operations guide, and it seems the
instructions for adding and removing a host to the OSD cluster looks not
as automatic as I would like it. Ideally, you really want the kind of
behaviour that ElasticSearch offers on this level so that adding and
removing nodes is almost a brain-dead task. Having said that, adding a
node seems easier then some of the storage systems/solutions I've seen
about the place :-).
So regardless of my concerns - I think this kind of storage is
definitely the future and I'm certainly cheering the CEPH team on for
this one. The functionality was fun (and yes kind of exciting) to play
with and I can see that the real-world possibilities of such a solution
in the open-source arena are quite probable now.
Other things to try from here
Check out another alternative:
Sheepdog, which also seems to be
gaining ground but only on the QEMU storage front. Its a very specific solution
as apposed to CEPH's generic storage solution.
Test CEPH integration with OpenNebula and OpenStack so you can see it within a
full cloud provisioning case. This might require some custom scripts to support
cloning RBD-stored base images etc. but should be interesting.
Test the S3
emulation provided by the RadosGW component.
Fedora has included Ceph for a couple of releases, but since my hosts
are on Fedora 14/15, I grabbed the latest ceph 0.3.1 sRPMs from Fedora
16 and rebuilt those to get something reasonably up2date. In the end I
have the following packages installed, though to be honest I don't
really need anything except the base 'ceph' RPM:
Installing the software is the easy bit, configuring the cluster is
where the fun begins. I had three hosts available for testing all of
which are virtualization hosts. Ceph has at least 3 daemons it needs to
run, which should all be replicated across several hosts for redundancy.
There's no requirement to use the same hosts for each daemon, but for
simplicity I decided to run every Ceph daemon on every virtualization
host.
My hosts are called lettuce, avocado and
mustard. Following the
Ceph wiki
instructions, I settled on a configuration file that looks like this:
The osd class dir bit should not actually be required, but the OSD
code looks in the wrong
place (/usr/lib instead of /usr/lib64) on x86_64 arches.
With the configuration file written, it is time to actually
initialize the cluster filesystem / object store. This is the really fun
bit. The Ceph wiki has
a very basic
page which talks about the mkcephfs tool, along with a scary warning
about how it'll 'rm -rf' all the data on the filesystem it is initializing. It turns
out that it didn't mean your entire host filesystem, As far as I can tell, it only
blows away the contents of the directory configured for 'osd data' and
'mon data', in my case both under /srv/ceph.
The recommended way is to let mkcephfs ssh into each of your hosts
and run all the configuration tasks automatically. Having tried the non-recommended
way and failed several times before finally getting it right, I can recommend
following the recommended way :-P There are some caveats not mentioned in the wiki
page though:
The configuration file above must be copied to /etc/ceph/ceph.conf
on every node before attempting to run
mkcephfs.
The configuration file on the host where you run mkcephfs must be
in /etc/ceph/ceph.conf or it will get rather confused about where it is in the other
nodes.
The mkcephfs command must be run as root since, it doesn't specify
'-l root' to ssh, leading to an inability to setup the nodes.
The directories /srv/ceph/osd$i must be pre-created, since it is
unable to do that itself, despite being able to creat the
/srv/ceph/mon$i directories.
With that in mind, I ran the following commands from my laptop, as root
 # n=0
 # for host in lettuce avocado mustard ; \
   do \
       ssh root@$host mkdir -p /etc/ceph /srv/ceph/mon$n; \
       n=$(expr $n + 1); \
       scp /etc/ceph/ceph.conf root@$host:/etc/ceph/ceph.conf
   done
 # mkcephfs -a -c /etc/ceph/ceph.conf -k /etc/ceph/keyring.bin
On the host where you ran mkcephfs there should now be a file
/etc/ceph/keyring.admin. This will be needed for mounting filesystems.
I copied it across to all my virtualization hosts
 # for host in lettuce avocado mustard ; \
   do \
       scp /etc/ceph/keyring.admin root@$host:/etc/ceph/keyring.admin; \
   done
Host Cluster Usage
Assuming the setup phase all went to plan, the cluster can now be started. A word of
warning though, Ceph really wants your clocks VERY well synchronized.
If your NTP server is a long way away, the synchronization might not be good enough
to stop Ceph complaining. You really want a NTP server on your local LAN for hosts to
sync against. Sort this out before trying to start the cluster.
 # for host in lettuce avocado mustard ; \
   do \
       ssh root@$host service ceph start; \
   done
The ceph tool can show the status of everything. The 'mon', 'osd' and
'msd' lines in the status ought to show all 3 host present & correct
The cluster configuration I chose has authentication enabled, so to actually mount
the ceph filesystem requires a secret key. This key is stored in the
/etc/ceph/keyring.admin file that was created earlier. To view the keyring
contents, the cauthtool program must be used
The base64 key there will be passed to the mount command, repeating on
every host needing a filesystem present:
# mount -t ceph 192.168.1.1:6789:/ /mnt/ -o name=admin,secret=AQDLk5VOeHkHLxAAfGjcaUsOXOhJr7hZCNjXSQ==
error adding secret to kernel, key name client.admin: No such device
For some reason, that error message is always printed on my Fedora hosts, and
despite that, the mount has actually succeeded
Congratulations, /mnt is now a distributed filesystem. If you create
a file on one host, it should appear on the other hosts & vica-verca.
RBD Volume setup
A shared filesystem is very nice, and can be used to hold regular virtual disk
images in a variety of formats (raw, qcow2, etc). What I really wanted to try was the
RBD virtual block device functionality in QEMU. Ceph includes a tool called
rbd for manipulating those. The syntax of this tool is pretty
self-explanatory
# rbd create --size 100 demo
# rbd ls
demo
# rbd info demo
rbd image 'demo':
	size 102400 KB in 25 objects
	order 22 (4096 KB objects)
	block_name_prefix: rb.0.0
	parent:  (pool -1)
Alternatively RBD volume creation can be done using qemu-img ...,
at least once the Fedora QEMU package is fixed to enable RBD support.
# qemu-img create -f rbd rbd:rbd/demo  100M
Formatting 'rbd:rbd/foo', fmt=rbd size=104857600 cluster_size=0
# qemu-img info rbd:rbd/demo
image: rbd:rbd/foo
file format: raw
virtual size: 100M (104857600 bytes)
disk size: unavailable
KVM guest setup
The syntax for configuring a RBD block device in libvirt, is very similar to that
used for Sheepdog. In Sheepdog, every single virtualization node is also a storage
node, so there is no hostname required. Not so for RBD. Here it is necessary to
specify one or more host names, for the RBD servers.
More observant people might be wondering how QEMU gets permission to connect to the
RBD server, given that the configuration earlier enabled authentication. This is thanks
to the magic of the /etc/ceph/keyring.admin file which must exist on any
virtualization server. Patches are currently being discussed which will allow
authentication credentials to be set via libvirt, avoiding the need to store the
credentials on the virtualization hosts permanently.
Ceph is a massively scalable, open source, distributed storage
system. It is comprised of an object store, block store, and a
POSIX-compliant distributed file system. The platform is capable of
auto-scaling to the exabyte level and beyond, it runs on commodity
hardware, it is self-healing and self-managing, and has no single point
of failure. Ceph is in the Linux kernel and is integrated with the
OpenStack cloud operating system. As a result of its open source
nature, this portable storage platform may be installed and used in
public or private clouds.
I.1. RADOS?
You can easily get confused by the denomination: Ceph? RADOS?
RADOS: Reliable Autonomic Distributed Object Store
is an object storage. RADOS takes care of distributing the objects
across the whole storage cluster and replicating them for fault
tolerance. It is built with 3 major components:
Object Storage Device (OSD): the storage daemon -
RADOS service, the location of your data. You must have this daemon
running on each server of your cluster. For each OSD you can have an
associated hard drive disks. For performance purpose it's usually better
to pool your hard drive disk with raid arrays, LVM or btrfs pooling.
With that, for one server your will have one daemon running. By default,
three pools are created: data, metadata and RBD.
Meta-Data Server (MDS): this is where the metadata
are stored. MDSs build POSIX file system on top of objects for Ceph
clients. However if you are not using the Ceph File System, you do not
need a meta data server.
Monitor (MON): this lightweight daemon handles all
the communications with the external applications and the clients. It
also provides a consensus for distributed decision making in a
Ceph/RADOS cluster. For instance when you mount a Ceph shared on a
client you point to the address of a MON server. It checks the state and
the consistency of the data. In an ideal setup you will at least run 3
ceph-mon daemons on separate servers. Quorum decisions and
calculs are elected by a majority vote, we expressly need odd number.
Ceph devoloppers recommend to use btrfs as a filesystem for the
storage. Using XFS is also possible and might be a better alternative
for production environements. Neither Ceph nor Btrfs are ready for
production. It could be really risky to put them together. This is why
XFS is an excellent alternative to btrfs. The ext4 filesystem is also
compatible but doesn't take advantage of all the power of Ceph.
We recommend configuring Ceph to use the XFS file system
in the near term, and btrfs in the long term once it is stable enough
for production.
RBD: as a block device. The linux kernel RBD (rados
block device) driver allows striping a linux block device over multiple
distributed object store data objects. It is compatible with the
kvm RBD image. See also:
Use RBD on a Client
.
CephFS: as a file, POSIX-compliant filesystem.
Ceph exposes its distributed object store (RADOS) and it can be accessed via
multiple interfaces:
RADOS Gateway: Swift and Amazon-S3 compatible RESTful
interface. For further
information.
librados and the related C/C++ bindings.
rbd and QEMU-RBD: linux kernel and QEMU block devices that
stripe data across multiple objects.
I.3. IS CEPH PRODUCTION-QUALITY?
The definition of "production quality" varies depending
on who you ask. Because it can mean a lot of different things depending
on how you want to use Ceph, we prefer not to think of it as a binary
term.
At this point we support the RADOS object store, radosgw, and RBD
because we think they are sufficiently stable that we can handle the
support workload. There are several organizations running those parts of
the system in production. Others wouldn't dream of doing so at this
stage.
The CephFS POSIX-compliant filesystem is functionally-complete and has
been evaluated by a large community of users, but has not yet been
subjected to extensive, methodical testing.
Since there is no stable version, I decided to version with
the upstream version of Ceph. Thus, I used the Ceph repository, I worked
with the last version available so 0.47.2:
Generate the keyring authentication, deploy the configuration and
configure the nodes. I will highly recommand to previously setup a SSH
key authentication based because mkcephfs will attempt to connect via
SSH to each servers (hostnames) you provided in the ceph configuration
file. It can be a pain in the arse to enter the ssh password for every
command run by mkcephfs!
Directory creation is not managed by the script so you have to create them
manually on each server:
Don't forget to mount your OSD directory according to your disk map
otherwise Ceph will by default use the root filesystem. It's up to you
to use ext4 or XFS. For those of you who want to setup an ext4 cluster I
extremly recommend to use the following mount options for your hard
drive disks:
$ sudo mkcephfs -a -c /etc/ceph/ceph.conf -k /etc/ceph/keyring.admin
Ceph doesn't need root permission to execute his command, it simply
needs to access the keyring. Each Ceph command you execute on the
command line assumes that you are the client.admin default user.
The client.admin key has been generated during the mkcephfs
process. The interesting thing to know about cephx is that it's based
on Kerberos ticket trust mecanism. If you want to go further with the
cephx authentication check the
ceph
documentation about it. Just make sure that your keyring is readable by
everyone:
$ sudo chmod +r /etc/ceph/keyring.admin
And launch all the daemons:
$ sudo service ceph start
This will run every Ceph daemons, namely OSD, MON and MDS (-a flag),
but you can specify a particular daemon with an extra parameter as osd,
mon or mds. Now check the status of your cluster by running
the following command:
$ ceph -k /etc/ceph/keyring.admin -c /etc/ceph/ceph.conf health
HEALTH_OK
As you can see I'm using the -k option, indeed Ceph
supports cephx secure authentication between the nodes within the
cluster, each connection and communication are initiated with this
authentication mecanism. It depends on your setup but it can be overkill
to use this system...
All the daemons are running (extract from the server-04):
Of course each pool might store more critical data, for instance my pool called
nova store the RBD volume of each virtual machine, so I increased the
replication level like this:
$ ceph osd pool set nova size 3
set pool 3 size to 3
II.7. Connect your client
Clients can access the RADOS cluster either directly via librados
with rados command. The usage of librbd is possible as
well with the RBD tool (via rbd
command), which creates an image / volume abstraction over the object
store. To achieve highly available monitor, simply put all of them in
the mount option:
I tried to simulate a MON failure while CephFS is mounted. I stopped
one of my MON server but precisely the one used for mounting CephFS. Oh
yes.. I forgot to tell you I used only one monitor to mount Ceph... And
the result was really unexpected, after I stopped the monitor the CephFS
didn't crashed and stayed alive :). There is some magic
performed under the hood by Ceph. I don't really know how but Ceph and
monitors are clever enough to figure out MON failure and re-initiate a
connection to an another monitor and thus keep the the mounting
filesystem alive.
Check this:
client:~$ mount | grep ceph
client:~$ sudo mount -t ceph 172.17.1.7:6789:/ /mnt -vv -o \
  name=admin,secret=AQDVGc5P0LXzJhAA5C019tbdrgypFNXUpG2cqQ==
client:~$ mount grep ceph
172.17.1.7:6789:/ on /mnt type ceph (rw,name=admin,secret=AQDVGc5P0LXzJhAA5C019tbdrgypFNXUpG2cqQ==)
client:~$ ls /mnt/
client:~$ touch /mnt/mon-ok
client:~$ ls /mnt/
mon-ok
client:~$ sudo netstat -plantu | grep EST | grep 6789
tcp        0      0 172.17.1.2:60462        172.17.1.7:6789         ESTABLISHED -
server6:~$ sudo service ceph stop mon
=== mon.2 ===
Stopping Ceph mon.2 on server6...kill 532...done
client:~$ touch /mnt/mon-3-down
client:~$ sudo netstat -plantu | grep EST | grep 6789
tcp        0      0 172.17.1.2:60462        172.17.1.5:6789         ESTABLISHED -
server6:~$ sudo service ceph start mon
=== mon.2 ===
Starting Ceph mon.2 on server6...
starting mon.2 rank 2 at 172.17.1.7:6789/0 mon_data /srv/ceph/mon2 fsid caf6e927-e87e-4295-ab01-3799d6e24be1
server4:~$ sudo service ceph stop mon
=== mon.1 ===
Stopping Ceph mon.1 on server4...kill 4049...done
client:~$ touch /mnt/mon-2-down
client:~$ sudo netstat -plantu | grep EST | grep 6789
tcp        0      0 172.17.1.2:60462        172.17.1.4:6789         ESTABLISHED -
client:~$ touch /mnt/mon-2-down
client:~$ ls /mnt/
mon-ok mon-3-down mon-2-down
Impressive!
III. Openstack integration
III.1. RDB and nova-volume
Before starting, here is my setup, I voluntary installed nova-volume on a node of
my Ceph cluster:
By default, the RBD pool named rbd will be use by OpenStack if
nothing is specified. I prefered to use nova as a pool, so I created it:
$ rados lspools
data
metadata
rbd
$ rados mkpool nova
$ rados lspools
data
metadata
rbd
nova
$ rbd --pool nova ls
volume-0000000c
$ rbd --pool nova info volume-0000000c
rbd image 'volume-0000000c':
  size 1024 MB in 256 objects
  order 22 (4096 KB objects)
  block_name_prefix: rb.0.0
  parent:  (pool -1)
Restart your nova-volume:
$ sudo service nova-volume restart
Try to create a volume, you shouldn't have any problem :)
$ nova volume-create --display_name=rbd-vol 1
Check this via:
$ nova volume-list
+----+-----------+--------------+------+-------------+-------------+
| ID |   Status  | Display Name | Size | Volume Type | Attached to |
+----+-----------+--------------+------+-------------+-------------+
| 51 | available | rbd-vol      | 1    | None        |             |
+----+-----------+--------------+------+-------------+-------------+
Check in RBD:
$ rbd --pool nova ls
volume-00000033
$ rbd --pool nova info volume-00000033
rbd image 'volume-00000033':
  size 1024 MB in 256 objects
  order 22 (4096 KB objects)
  block_name_prefix: rb.0.3
  parent:  (pool -1)
Everything looks great, but wait.. can I attach it to an instance?
Since we are using cephx authentication, nova and libvirt require a couple
more steps.
For security and clarity purpose you may want to create a new user and give
it access to your Ceph cluster with fine permissions. Let's say that you want
to use a user called nova, each connection to your MON server will
be initiate as client.nova instead of client.admin.
This behavior is define by the rados_create function which create a
handle for communicating with your RADOS cluster. Ceph environment variables are
read when this is called, so if $CEPH_ARGS specifies everything you
need to connect, no further configuration is necessary. The trick is to add the
following lines at the beginning of
the /usr/lib/python2.7/dist-packages/nova/volume/driver.py file:
# use client.nova instead of nova.admin
import os
os.environ["CEPH_ARGS"] = "--id nova"
Adding the variable via the init script of nova-volume should also
work, it's up to you. The nova user needs this environment variable.
Here I assume that you use client.admin, if you use
client.nova change every values called admin to
nova. Now we can start to configure the secret in libvirt, create
a file secret.xml and add this content:
Login to your compute node where the instance is running and check
the id of the running instance. If you don't know where the instance is
running launch the following commands:
As you can see my instance is running on the server-02, pick up the
id of your instance here instance-000000d6 in virsh. Attach it manually
with virsh:
Now check inside your instance, for this use your credential and log into it
via ssh. You will see a new device called vdb:
server-02:~$ ssh -i seb.pem ubuntu@192.168.22.36
ubuntu@instance-over-rbd:~$ sudo fdisk -l
Disk /dev/vda: 2147 MB, 2147483648 bytes
255 heads, 63 sectors/track, 261 cylinders, total 4194304 sectors
Units = sectors of 1 * 512 = 512 bytes
Sector size (logical/physical): 512 bytes / 512 bytes
I/O size (minimum/optimal): 512 bytes / 512 bytes
Disk identifier: 0x00000000
   Device Boot      Start         End      Blocks   Id  System
/dev/vda1   *       16065     4192964     2088450   83  Linux
Disk /dev/vdb: 1073 MB, 1073741824 bytes
16 heads, 63 sectors/track, 2080 cylinders, total 2097152 sectors
Units = sectors of 1 * 512 = 512 bytes
Sector size (logical/physical): 512 bytes / 512 bytes
I/O size (minimum/optimal): 512 bytes / 512 bytes
Disk identifier: 0x00000000
Disk /dev/vdb doesn't contain a valid partition table
Now you are ready to use it:
ubuntu@instance-over-rbd:~$ sudo mkfs.ext4 /dev/vdb
mke2fs 1.42 (29-Nov-2011)
Filesystem label=
OS type: Linux
Block size=4096 (log=2)
Fragment size=4096 (log=2)
Stride=0 blocks, Stripe width=0 blocks
65536 inodes, 262144 blocks
13107 blocks (5.00%) reserved for the super user
First data block=0
Maximum filesystem blocks=268435456
8 block groups
32768 blocks per group, 32768 fragments per group
8192 inodes per group
Superblock backups stored on blocks:
  32768, 98304, 163840, 229376
Allocating group tables: done
Writing inode tables: done
Creating journal (8192 blocks): done
Writing superblocks and filesystem accounting information: done
ubuntu@instance-over-rbd:~$ sudo mount /dev/vdb /mnt
ubuntu@instance-over-rbd:~$ df -h
Filesystem      Size  Used Avail Use% Mounted on
/dev/vda1       2.0G  668M  1.3G  35% /
udev            242M   12K  242M   1% /dev
tmpfs            99M  212K   99M   1% /run
none            5.0M     0  5.0M   0% /run/lock
none            246M     0  246M   0% /run/shm
/dev/vdb       1022M   47M  924M   5% /mnt
ubuntu@instance-over-rbd:~$ sudo touch /mnt/test
ubuntu@instance-over-rbd:~$ ls /mnt/
lost+found  test
Last but not least, edit your nova.conf on each nova-compute server
with the authentication value. It's working without those options, since
we added them manually to libvirt, but I think it good to tell them to
nova. You will be able to attach a volume to an instance from the nova
cli with nova volume-attach command and from the dashboard as well :D
$ nova volume-create --display_name=nova-rbd-vol 1
$ nova volume-list
+----+-----------+--------------+------+-------------+--------------------------------------+
| ID |   Status  | Display Name | Size | Volume Type |             Attached to              |
+----+-----------+--------------+------+-------------+--------------------------------------+
| 51 | available | rbd-vol      | 1    | None        |                                      |
| 57 | available | nova-rbd-vol | 1    | None        |                                      |
+----+-----------+--------------+------+-------------+--------------------------------------+
$ nova volume-attach e1457eea-ef67-4df3-8ba4-245d104d2b11 57 /dev/vdd
$ nova volume-list
+----+-----------+--------------+------+-------------+--------------------------------------+
| ID |   Status  | Display Name | Size | Volume Type |             Attached to              |
+----+-----------+--------------+------+-------------+--------------------------------------+
| 51 | available | rbd-vol      | 1    | None        |                                      |
| 57 | in-use    | nova-rbd-vol | 1    | None        | e1457eea-ef67-4df3-8ba4-245d104d2b11 |
+----+-----------+--------------+------+-------------+--------------------------------------+
The first disk is marked as available simply because it has been attached manually with virsh and not with nova. Have a look inside your virtual machine :)
/!\ Important note, the secret.xml needs to be added on each
nova-compute, more precisely to libvirt. Keep the first secret (uuid)
and put it into your secret.xml. The file below becomes your new secret.xml reference file.
error : qemuMonitorJSONCheckError:318 : internal error unable to execute QEMU command 'device_add': Device 'virtio-blk-pci' could not be initialized
error : qemuMonitorJSONCheckError:318 : internal error unable to execute QEMU command 'device_add': Duplicate ID 'virtio-disk2' for device
The first one occured when I tried to mount a volume with /dev/vdb as device name and the second occured with /dev/vdc. Solved by using a different device name than /dev/vdc/,
I think libvirt remembers 'somewhere' and 'somehow' that a device was
previously attached (the manually one). I didn't really investigate
since it can be simply solved.
EDIT: 11/07/2012
Some people reported tp me a common issue. There were unable to
attach a RBD device with nova, but with libvirt it's fine. If you have
difficulties to make it working, you will probably need to update the
libvirt AppArmor profile. If you check your /var/log/libvirt/qemu/your_instance_id.log, you should see:
unable to find any monitors in conf. please specify monitors via -m monaddr or -c ceph.conf
And if you dive into the debug mode:
debug : virJSONValueFromString:914 : string={"return": "error connecting\r\ncould not \
  open disk image rbd:nova/volume-00000050: No such file or directory\r\n", "id": "libvirt-12"}
And of course it's log in AppArmor and it's pretty explicit:
Now edit the libvirt AppArmor profile, you need to adjust access controls for all
VMs, new or existing:
$ sudo echo "/etc/ceph/** r," | sudo tee -a /etc/apparmor.d/abstractions/libvirt-qemu
$ sudo service libvirt-bin restart
$ sudo service apparmor reload
That's all, after this libvirt/qemu will be able to read your ceph.conf and your
keyring (if you use cephx) ;-).
III.2. RBD and Glance
III.2.1. RBD as Glance storage backend
I followed the official instructions from OpenStack documentation.
I recommend to follow the upstream package from Ceph since the Ubuntu
repo doesn't provide a valid version. This issue has been recently
reported by Florian Haas in the OpenStack and Ceph mailing list however
the bug has already been tracked here.
It has been uploaded to precise-proposed for SRU review and waiting for
approval, this shouldn't be too long. Be sure to add the Ceph repo (deb http://ceph.com/debian/ precise main) on your Glance server (as I did earlier).
$ sudo apt-get install python-ceph
Modify your glance-api.conf like so:
# Set the rbd storage
default_store = rbd
# ============ RBD Store Options =============================
# Ceph configuration file path
# If using cephx authentication, this file should
# include a reference to the right keyring
# in a client.<USER> section
rbd_store_ceph_conf = /etc/ceph/ceph.conf
# RADOS user to authenticate as (only applicable if using cephx)
rbd_store_user = glance
# RADOS pool in which images are stored
rbd_store_pool = images
# Images will be chunked into objects of this size (in megabytes).
# For best performance, this should be a power of two
rbd_store_chunk_size = 8
According to the glance configuration, I created a new pool and a new user for RADOS:
$ sudo service glance-api restart && sudo service glance-registry restart
Before uploading check your images pools:
$ rados --pool=images ls
rbd_directory
rbd_info
Try to upload a new image.
$ wget http://cloud-images.ubuntu.com/precise/current/precise-server-cloudimg-amd64-disk1.img
$ glance add name="precise-ceph" is_public=True disk_format=qcow2 container_format=ovf architecture=x86_64 < precise-server-cloudimg-amd64-disk1.img
Uploading image 'precise-ceph'
======================================================================================================[100%] 26.2M/s, ETA  0h  0m  0s
Added new image with ID: 70685ad4-b970-49b7-8bde-83e58b255d95
Check in glance:
$ glance index
ID                                   Name                           Disk Format          Container Format     Size
------------------------------------ ------------------------------ -------------------- -------------------- --------------
60beab84-81a7-46d1-bb4a-19947937dfe3 precise-ceph                   qcow2                ovf                       227213312
The first command initiates and create the snapshot with name
56642cf3d09b49a7aa400b6bc07494b9 from the image disk of the instance
located here /var/lib/nova/instances/instance-00000097/disk.
The second command will convert the image from qcow2 to qcow2 and
store the backup into Glance thus in RBD. Here the image is stored as
qcow2 format, this is not really what we want! I want to store an RBD
(format) image.
The third command deletes the local file of the snapshot, no longer
needed since the image has been stored in the Glance backend.
When you attempt to perform a snapshot of an instance from the dashboard or via the nova image-create command, nova executes a local copy of changes in a qcow2 file, however this file will be stored in Glance.
If you want to run a RBD snapshot through OpenStack, you need to take
a volume snapshot. These functionnality is not exposed in the dashboard
yet.
Snapshot a RBD volume:
snapshot snapshot-00000004: creating
snapshot snapshot-00000004: creating from (pid=18829) create_snapshot
rbd --pool nova snap create --snap snapshot-00000004 volume-00000042
snapshot snapshot-00000004: created successfully from (pid=18829) create_snapshot
Verify:
$ rbd --pool=nova snap ls volume-00000042
2 snapshot-00000004   1073741824
Full RBD managment?
$ qemu-img info precise-server-cloudimg-amd64.img
image: precise-server-cloudimg-amd64.img
file format: qcow2
virtual size: 2.0G (2147483648 bytes)
disk size: 217M
cluster_size: 65536
$ sudo qemu-img convert -f qcow2 -O rbd precise-server-cloudimg-amd64.img rbd:images/glance
$ qemu-img info rbd:nova/ceph-img-cli
image: rbd:nova/ceph-img-cli
file format: raw
virtual size: 2.0G (2147483648 bytes)
disk size: unavailable
There is a surprising value here, why does the image appear as raw format? And why does the file size become unavailable? For those of you, you want to go further with Qemu-RBD snapshot, see the documentation from Ceph
III.3. Does the dream come true?
Boot from a RBD image?
I uploaded a new image in the glance RBD backend and try to boot with
this image and it works. Glance is able to retrieve images over the RBD
backend configured. You will usually see this log message:
INFO nova.virt.libvirt.connection [-] [instance: ce230d11-ddf8-4298-a7d9-40ae8690ff11] Instance spawned successfully.
III.4. Boot from a volume
Booting from a volume will require specifying a dummy image id, as shown in these scripts:
start-rbd
#!/bin/bash
set -e
DIR=`dirname $0`
if [ ! -f $DIR/debian.img ]; then
        echo "Downloading debian image..."
        wget http://ceph.newdream.net/qa/debian.img -O $DIR/debian.img
fi
touch $DIR/dummy_img
glance add name="dummy_raw_img" is_public=True disk_format=rawi container_format=ovf architecture=x86_64 < dummy_img
echo "Waiting for image to become available..."
while true; do
        if ( timeout 5 nova image-list | egrep -q 'dummy_raw_img|ACTIVE' ) then
                break
        fi
        sleep 2
done
echo "Creating volume..."
nova volume-create --display_name=dummy 1
echo "Waiting for volume to be available..."
while true; do
        if ( nova volume-list | egrep -q 'dummy|available' ) then
                break
        fi
        sleep 2
done
echo "Replacing blank image with real one..."
# last created volume id, assuming pool nova
DUMMY_VOLUME_ID=$(rbd --pool=nova ls | sed -n '$p')
rbd -p nova rm $VOLUME_ID
rbd -p nova import $DIR/debian.img $DUMMY_VOLUME_ID
echo "Requesting an instance..."
$DIR/boot-from-volume
echo "Waiting for instance to start..."
while true; do
        if ( nova list | egrep -q "boot-from-rbd|ACTIVE" ) then
                break
        fi
        sleep 2
done
#!/usr/bin/env python
import argparse
import httplib2
import json
import os
def main():
    http = httplib2.Http()
    parser = argparse.ArgumentParser(description='Boot an OpenStack instance from RBD')
    parser.add_argument(
        '--endpoint',
        help='the Nova API endpoint (http://IP:port/vX.Y/)',
        default=os.getenv("http://172.17.1.6:8774/v2/"),
        )
    parser.add_argument(
        '--image-id',
        help="The image ID Nova will pretend to boot from (ie, 1 -- not ami-0000001)",
        default=4,
        )
    parser.add_argument(
        '--volume-id',
        help='The RBD volume ID (ie, 1 -- not volume-0000001)',
        default=1,
        )
    parser.add_argument(
        '-v', '--verbose',
        action='store_true',
        default=False,
        help='be more verbose',
        )
    args = parser.parse_args()
    headers = {
        'Content-Type': 'application/json',
        'x-auth-project-id': 'admin',
        'x-auth-token': 'admin:admin',
        'Accept': 'application/json',
        }
    req = {
        'server':
            {
            'min_count': 1,
            'flavorRef': 1,
            'name': 'test1',
            'imageRef': args.image_id,
            'max_count': 1,
            'block_device_mapping': [{
                    'virtual': 'root',
                    'device_name': '/dev/vda',
                    'volume_id': args.volume_id,
                    'delete_on_termination': False,
                    }]
            }}
    resp, body = http.request(
        '{endpoint}/volumes/os-volumes_boot'.format(endpoint=args.endpoint),
        method='POST',
        headers=headers,
        body=json.dumps(req),
        )
    if resp.status == 200:
        print "Instance scheduled successfully."
        if args.verbose:
            print json.dumps(json.loads(body), indent=4, sort_keys=True)
    else:
        print "Failed to create an instance: response status", resp.status
        print json.dumps(json.loads(body), indent=4, sort_keys=True)
if __name__ == '__main__':
    main()
Both are a little bit deprecated so I re-wrote some parts, it's not
that demanding. I barely spent much time on it, so there's still work to
be done. For example, I don't use euca API, so I simply re-wrote
according to nova-api.
Josh Durgin from Inktank said the following:
What's missing is that OpenStack doesn't yet have the
ability to initialize a volume from an image. You have to put an image
on one yourself before you can boot from it currently. This should be
fixed in the next version of OpenStack. Booting off of RBD is nice
because you can do live migration, although I haven't tested that with
OpenStack, just with libvirt. For Folsom, we hope to have copy-on-write
cloning of images as well, so you can store images in RBD with glance,
and provision instances booting off cloned RBD volumes in very little
time.
I quickly tried this manipulation, but without success:
$ nova volume-create --display_name=dummy 1
$ nova volume-list
+----+-----------+--------------+------+-------------+--------------------------------------+
| ID |   Status  | Display Name | Size | Volume Type |             Attached to              |
+----+-----------+--------------+------+-------------+--------------------------------------+
| 69 | available | dummy        | 2    | None        |                                      |
+----+-----------+--------------+------+-------------+--------------------------------------+
$ rbd -p nova ls
volume-00000045
$ rbd import debian.img volume-00000045
Importing image: 13% complete...2012-06-08 13:45:34.562112 7fbb19835700  0 client.4355.objecter  pinging osd that serves lingering tid 1 (osd.1)
Importing image: 27% complete...2012-06-08 13:45:39.563358 7fbb19835700  0 client.4355.objecter  pinging osd that serves lingering tid 1 (osd.1)
Importing image: 41% complete...2012-06-08 13:45:44.563607 7fbb19835700  0 client.4355.objecter  pinging osd that serves lingering tid 1 (osd.1)
Importing image: 55% complete...2012-06-08 13:45:49.564244 7fbb19835700  0 client.4355.objecter  pinging osd that serves lingering tid 1 (osd.1)
Importing image: 69% complete...2012-06-08 13:45:54.565737 7fbb19835700  0 client.4355.objecter  pinging osd that serves lingering tid 1 (osd.1)
Importing image: 83% complete...2012-06-08 13:45:59.565893 7fbb19835700  0 client.4355.objecter  pinging osd that serves lingering tid 1 (osd.1)
Importing image: 97% complete...2012-06-08 13:46:04.567426 7fbb19835700  0 client.4355.objecter  pinging osd that serves lingering tid 1 (osd.1)
Importing image: 100% complete...done.
$ nova boot --flavor m1.tiny --image precise-ceph --block_device_mapping vda=69:::0 --security_groups=default boot-from-rbd
III.5. Live migration with CephFS!
I was brave enough to also experimented the live migration with the
Ceph Filesystem. Some of these pre-requites are obvious but just to be
sure, with the live-migration comes mandatory requirements as:
2 compute nodes
a distributed file system, here CephFS
For the live-migration configuration I followed the official OpenStack documentation. The following actions need to be performed on each compute node:
Update the libvirt configurations. Modify /etc/libvirt/libvirtd.conf:
listen_tls = 0
listen_tcp = 1
auth_tcp = "none"
Modify /etc/init/libvirt-bin.conf and add the -l option:
libvirtd_opts=" -d -l"
Restart libvirt. After executing the command, ensure that libvirt is succesfully restarted.
Make sure that you see the -l flag in the ps command. You should be able to retrieve the information (passwordless) from an hypervisor to another, to test it simply run:
server-02:/$ sudo virsh --connect qemu+tcp://server-01/system list
Id Name                 State
----------------------------------
   1 instance-000000af    running
   3 instance-000000b5    running
Sometimes you can get this message from the nova-scheduler logs:
Casted 'live_migration' to compute 'server-01' from (pid=10963) cast_to_compute_host /usr/lib/python2.7/dist-packages/nova/scheduler/driver.py:80
And somehow you must get something from the logs, so check:
nova-compute logs
nova-scheduler logs
libvirt logs
The libvirt logs could show those errors:
error : virExecWithHook:328 : Cannot find 'pm-is-supported' in path: No such file or directory
error : virNetClientProgramDispatchError:174 : Unable to read from monitor: Connection reset by peer
The first issue (pm) was solved by installing this package:
$ sudo apt-get install pm-utils -y
The second one is a little bit more tricky, the only glue I found was to disable the VNC console according to this thread.
Finally check the log and see:
instance: 962c222f-2280-43e9-83be-c27a31f77946] Migrating instance to server-02 finished successfully.
Sometimes this message doesn't appear, but the live-migration
successfully performed, the best check is to wait and watch on the
distant server:
$ watch sudo virsh list
Every 2.0s: sudo virsh list
Id Name                  State
----------------------------------
Every 2.0s: sudo virsh list
Id Name                  State
----------------------------------
6 instance-000000dc    shut off
Every 2.0s: sudo virsh list
Id Name                  State
----------------------------------
6 instance-000000dc    paused
Every 2.0s: sudo virsh list
Id Name                  State
----------------------------------
6 instance-000000dc    running
During the live migration, you should see those states in virsh:
shut off
paused
running
That's all!
The downtime for m2.tiny instance was approximatively 3 sec.
III.6. Virtual instances disk's errors - Solved!
When I use Ceph to store the /var/lib/nova/instances directory of each nova-compute server I have these I/O errors inside the virtual machines...
Buffer I/O error on device vda1, logical block 593914
Buffer I/O error on device vda1, logical block 593915
Buffer I/O error on device vda1, logical block 593916
EXT4-fs warning (device vda1): ext4_end_bio:251: I/O error writing to inode 31112 (offset 7852032 size 524288 starting block 595925)
JBD2: Detected IO errors while flushing file data on vda1-8
Logs from the kernel during the boot sequence of the instance:
This issue appears everytime I launched a new instance. Sometimes
waiting for the ext4 auto mecanism recovery solve temporary the problem
but the filesystem still stays unstable. This error is probably due to
the ext4 filesystem. It happens really often and I don't have any clue
at the moment maybe a filesystem option or switching from ext4 to XFS
will do the trick. At the moment I tried several mount options inside
the VM like nobarrier or noatime but nothing changed. This is what I got when I tried to perform a basic operation like installing a package:
Reading package lists... Error!
E: Unable to synchronize mmap - msync (5: Input/output error)
E: The package lists or status file could not be parsed or opened.
This can be solved by the following commands but it's neither useful nor relevant since this error will occur again and again...
server-003:~$ sudo fsck.ext4 -fy /dev/nova-volumes/lvol0
e2fsck 1.42 (29-Nov-2011)
Pass 1: Checking inodes, blocks, and sizes
Pass 2: Checking directory structure
Pass 3: Checking directory connectivity
/lost+found not found.  Create? yes
Pass 4: Checking reference counts
Pass 5: Checking group summary information
/dev/nova-volumes/lvol0: ***** FILE SYSTEM WAS MODIFIED *****
/dev/nova-volumes/lvol0: 3435/6553600 files (6.7% non-contiguous), 2783459/26214400 blocks
Nothing relevant, everything is properly working.
This issue is unsolved, it's simply related to the fact that
CephFS is not stable enough. It can't handle this amount of I/O. A
possible work around, here and here.
I don't even thing that using XFS instead of ext4 will change the
outcome. It seems that this issue also occur with RBD volume, see on the ceph tracker.
According to this reported bug
(and the mailing list discussion) this issue affects rbd volumes inside
virtual machine, the workaround here is to active the rbd caching, an
option should be added inside the xml file while attaching a device.
I didn't check this workaround yet, but it seems to be solved by enabling the cache.
UPDATE: 13/06/2012 - I/O ISSUES SOLVED
It seems that Ceph has a lot of difficulties with the direct I/O support, see below:
$ mount | grep ceph
172.17.1.4:6789,172.17.1.5:6789,172.17.1.7:6789:/ on /mnt type ceph (name=admin,key=client.admin)
$ dd if=/dev/zero of=/mnt/directio bs=8M count=1 oflag=direct
1+0 records in
1+0 records out
8388608 bytes (8.4 MB) copied, 0.36262 s, 23.1 MB/s
$ dd if=/dev/zero of=/mnt/directio bs=9M count=1 oflag=direct
dd: writing `/mnt/directio': Bad address
1+0 records in
0+0 records out
0 bytes (0 B) copied, 1.20184 s, 0.0 kB/s
Setting the cache to none means using direct I/O... Note from the libvirt documentation:
The optional cache attribute controls the cache
mechanism, possible values are "default", "none", "writethrough",
"writeback", "directsync" (like "writethrough", but it bypasses the host
page cache) and "unsafe" (host may cache all disk io, and sync requests
from guest are ignored). Since 0.6.0, "directsync" since 0.9.5,
"unsafe" since 0.9.7
Cache parameters explained:
none: uses O_DIRECT I/O that bypasses the filesystem cache on the host
writethrough: uses O_SYNC I/O that is guaranteed to
be commited to disk on return to userspace. Only cache read requests
and immediately write to disk.
writeback: uses normal buffered I/O that is written
back later by the operating system. It caches the write requests in
RAM, which bring high-performance but also increase the data loss
probability.
Actually there is already a function to test if direct I/O are supported:
@staticmethod
    def _supports_direct_io(dirpath):
        testfile = os.path.join(dirpath, ".directio.test")
        hasDirectIO = True
        try:
            f = os.open(testfile, os.O_CREAT | os.O_WRONLY | os.O_DIRECT)
            os.close(f)
            LOG.debug(_("Path '%(path)s' supports direct I/O") %
                      {'path': dirpath})
        except OSError, e:
            if e.errno == errno.EINVAL:
                LOG.debug(_("Path '%(path)s' does not support direct I/O: "
                            "'%(ex)s'") % {'path': dirpath, 'ex': str(e)})
                hasDirectIO = False
            else:
                LOG.error(_("Error on '%(path)s' while checking direct I/O: "
                            "'%(ex)s'") % {'path': dirpath, 'ex': str(e)})
                raise e
        except Exception, e:
            LOG.error(_("Error on '%(path)s' while checking direct I/O: "
                        "'%(ex)s'") % {'path': dirpath, 'ex': str(e)})
            raise e
        finally:
            try:
                os.unlink(testfile)
            except:
                pass
        return hasDirectIO
Somehow it's not detected, mainly because the issue is related to the block size.
If direct I/O are supported it will specified in this file /usr/lib/python2.7/dist-packages/nova/virt/libvirt/connection.py, on line 1036:
@property
def disk_cachemode(self):
    if self._disk_cachemode is None:
        # We prefer 'none' for consistent performance, host crash
        # safety & migration correctness by avoiding host page cache.
        # Some filesystems (eg GlusterFS via FUSE) don't support
        # O_DIRECT though. For those we fallback to 'writethrough'
        # which gives host crash safety, and is safe for migration
        # provided the filesystem is cache coherant (cluster filesystems
        # typically are, but things like NFS are not).
        self._disk_cachemode = "none"
        if not self._supports_direct_io(FLAGS.instances_path):
            self._disk_cachemode = "writethrough"
    return self._disk_cachemode
The first trick was to modify this line:
self._disk_cachemode = "none"
With
self._disk_cachemode = "writethrough"
With this change, every instances will have the libvirt cache option set to writethrough even if the filesystem supports direct I/O.
Fix a corrumpted VM:
FSCKFIX=yes
Reboot the VM :)
Note: writeback is also supported with Ceph, it offers better performance than writethrough but writeback stays the safest way for your data. It depends on your need :)
IV. Benchmarks
Thoses benchmarks have been performed under ext4 filesystem and on 15K RPM hard drive disks.
$ for i in 0 1 2; do ceph osd tell $i bench; done
ok
ok
ok
Monitor the output from an another terminal:
$ ceph -w
osd.0 172.17.1.4:6802/22135 495 : [INF] bench: wrote 1024 MB in blocks of 4096 KB in 4.575725 sec at 223 MB/sec
osd.1 172.17.1.5:6801/8713 877 : [INF] bench: wrote 1024 MB in blocks of 4096 KB in 22.559266 sec at 46480 KB/sec
osd.2 172.17.1.7:6802/737 1274 : [INF] bench: wrote 1024 MB in blocks of 4096 KB in 20.011638 sec at 52398 KB/sec
As you can see, I have pretty bad performance on 2 OSDs. Both of them
will bring down the performance of my whole cluster. (this statment
will be verified bellow)
server-03:~$ time dd if=/dev/zero of=test bs=2000M count=1; time scp test root@server-04:/dev/null;
2097152000 bytes (2.1 GB) copied, 4.46267 s, 470 MB/s
root@server-04's password:
test                                                         100% 2000MB  52.6MB/s   00:47
real  0m49.298s
user  0m43.915s
sys   0m5.172s
It's not really surprising since Ceph showed an average of 53MB/s. I
clairly have a network bottlenck because all my servers are connected
with GBit. I also test a copy from the root partition to the ceph shared
mount directory to see how long does it take to write data into ceph:
$ time dd if=/dev/zero of=pouet bs=2000M count=1; time sudo cp pouet /var/lib/nova/instances/;
1+0 records in
1+0 records out
2097152000 bytes (2.1 GB) copied, 4.27012 s, 491 MB/s
real  0m4.465s
user  0m0.000s
sys   0m4.456s
real  0m5.778s
user  0m0.000s
sys   0m3.580s
The information reported by the -w option are asynchronous and not really significant. For instances we can't tell that storing 2GB in Ceph DFS took 37 seconds.
Benchmark your filesystem in order to detect I/O errors (ext4 oriented):
I/O stress Download me
/*
 * Copyright (C) 2010 Canonical
 *
 * This program is free software; you can redistribute it and/or
 * modify it under the terms of the GNU General Public License
 * as published by the Free Software Foundation; either version 2
 * of the License, or (at your option) any later version.
 *
 * This program is distributed in the hope that it will be useful,
 * but WITHOUT ANY WARRANTY; without even the implied warranty of
 * MERCHANTABILITY or FITNESS FOR A PARTICULAR PURPOSE.  See the
 * GNU General Public License for more details.
 *
 * You should have received a copy of the GNU General Public License
 * along with this program; if not, write to the Free Software
 * Foundation, Inc., 51 Franklin Street, Fifth Floor, Boston, MA 02110-1301, USA.
 *
 */
/*
 *  Author Colin Ian King,  colin.king@canonical.com
 */
#include <stdlib.h>
#include <stdio.h>
#include <string.h>
#include <unistd.h>
#include <fcntl.h>
#include <sys/types.h>
#include <sys/stat.h>
#include <sys/ioctl.h>
#include <linux/fs.h>
#include "fiemap.h"
#define FS_IOC_FIEMAP                      _IOWR('f', 11, struct fiemap)
void syntax(char **argv)
{
  fprintf(stderr, "%s [filename]...\n",argv[0]);
}
struct fiemap *read_fiemap(int fd)
{
  struct fiemap *fiemap;
  int extents_size;
  if ((fiemap = (struct fiemap*)malloc(sizeof(struct fiemap))) == NULL) {
      fprintf(stderr, "Out of memory allocating fiemap\n");
      return NULL;
  }
  memset(fiemap, 0, sizeof(struct fiemap));
  fiemap->fm_start = 0;
  fiemap->fm_length = 2*1024*1024;        /* Lazy */
  fiemap->fm_flags = 0;
  fiemap->fm_extent_count = 0;
  fiemap->fm_mapped_extents = 0;
  /* Find out how many extents there are */
  if (ioctl(fd, FS_IOC_FIEMAP, fiemap) < 0) {
      fprintf(stderr, "fiemap ioctl() failed\n");
      return NULL;
  }
  /* Read in the extents */
  extents_size = sizeof(struct fiemap_extent) *
                              (fiemap->fm_mapped_extents);
  /* Resize fiemap to allow us to read in the extents */
  if ((fiemap = (struct fiemap*)realloc(fiemap,sizeof(struct fiemap) +
                                         extents_size)) == NULL) {
      fprintf(stderr, "Out of memory allocating fiemap\n");
      return NULL;
  }
  memset(fiemap->fm_extents, 0, extents_size);
  fiemap->fm_extent_count = fiemap->fm_mapped_extents;
  fiemap->fm_mapped_extents = 0;
  if (ioctl(fd, FS_IOC_FIEMAP, fiemap) < 0) {
      fprintf(stderr, "fiemap ioctl() failed\n");
      return NULL;
  }

  return fiemap;
}
void dump_fiemap(struct fiemap *fiemap, char *filename)
{
  int i;
  printf("File %s has %d extents:\n",filename, fiemap->fm_mapped_extents);
  printf("#\tLogical          Physical         Length           Flags\n");
  for (i=0;i<fiemap->fm_mapped_extents;i++) {
      printf("%d:\t%-16.16llx %-16.16llx %-16.16llx %-4.4x\n",
          i,
          fiemap->fm_extents[i].fe_logical,
          fiemap->fm_extents[i].fe_physical,
          fiemap->fm_extents[i].fe_length,
          fiemap->fm_extents[i].fe_flags);
  }
  printf("\n");
}
int main(int argc, char **argv)
{
  int i;
  if (argc < 2) {
      syntax(argv);
      exit(EXIT_FAILURE);
  }
  for (i=1;i<argc;i++) {
      int fd;
      if ((fd = open(argv[i], O_RDONLY)) < 0) {
          fprintf(stderr, "Cannot open file %s\n", argv[i]);
      }
      else {
          struct fiemap *fiemap;
          if ((fiemap = read_fiemap(fd)) != NULL)
              dump_fiemap(fiemap, argv[i]);
          close(fd);
      }
  }
  exit(EXIT_SUCCESS);
}
I hope I will be able to go further and use Ceph for production. Ceph
seems fearly stable enough at the moment, for RBD and RADOS, CephFS
doesn't seem capable to handle huge I/O traffic. Also keep in mind that a
company called Inktank offers a
commercial support for Ceph, I don't thing it's a coincidence. Ceph will
have a bright future. The recovery procedure is excellent, of course
there is a lot of component which I would loved to play like fine
crushmap tunning. This article could be updated at any time since I'm
taking my research further :).
This article wouldn't have been possible without the tremendous help of Josh Durgin from Inktank, many many thanks to him :)
Ceph,
an up and coming distributed file system, has a lot of great design
goals. In short, it aims to distribute both data and metadata among
multiple servers, providing both fault tolerant and scalable network
storage. Needless to say, this has me excited, and while it's still
under heavy development, I've been experimenting with it and thought
I'd share a few simple benchmarks.
I've tested two different 'flavors' of Ceph, the first I believe is
referred to as "Ceph filesystem", which is similar in function to NFS,
where the file metadata (in addition to the file data) is handled by
remote network services and the filesystem is mountable by multiple
clients. The second is a "RADOS block device", or RBD. This refers to a
virtual block device that is created from Ceph storage. This is similar
in function to iSCSI, where remote storage is mapped into looking like a
local SCSI device. This means that it's formatted and mounted
locally and other clients can't use it without corruption (unless you
format it with a cluster filesystem like GFS or OCFS).
If you're wondering what RADOS is, it's Ceph's acronym version of
RAID. I believe it stands for "Reliable Autonomous Distributed Object
Store". Technically, the Ceph filesystem is implemented on top of RADOS,
and other things are capable of using it directly as well, such as the
RADOS gateway, which is a proxy server that provides object store
services like that of Amazon's S3. A librados library is also available
that provides an API for customizing your own solutions.
I've taken the approach of comparing cephfs to nfs, and rbd to both
iscsi and multiple iscsi devices striped over different servers. Mind
you, Ceph provides many more features, such as snapshots and thin
provisioning, not to mention the fault tolerance, but if we were to
replace the function of NFS we'd put Ceph fs in its place; likewise if
we replaced iSCSI, we'd use RBD. It's good to keep this in mind because
of the penalties involved with having metadata at the server; we don't
expect Ceph fs or NFS to have the metadata performance of a local
filesystem.
Ceph (version .032) systems were 3 servers running mds+mon services.
These were quad core servers, 16G RAM. The storage was provided by 3
osd servers (24 core AMD box, 32GB RAM, 28 available 2T disks, LSI
9285-8e), each server used 10 disks, one osd daemon for each 2T disk,
and an enterprise SSD partitioned up with 10 x 1GB journal devices.
Tried both btrfs and xfs on the osd devices, for these tests there was
no difference. CRUSH placement defined that no replica should be on the
same host, 2 copies of data and 3 copies of metadata. All servers had
gigabit NICs.
Second Ceph system has monitors, mds, and osd all on one box. This
was intended to be a more direct comparison to the NFS server below, and
used the same storage device served up by a single osd daemon.
NFS server was one of the above osd servers with a group of 12 2T drives in RAID50 formatted xfs and exported.
RADOS benchmarks ran on the same two Ceph systems above, from which a 20T RBD device was created.
ISCSI server was tested with one of the above osd servers exporting a 12 disk RAID50 as a target.
ISCSI-md was achieved by having all three osd servers export a 12 disk RAID50 and the client striping across them.
All filesystems were mounted noatime,nodiratime whether available or
not. All servers were running kernel 3.1.0-rc1 on centos
6. Benchmarks were performed using bonnie++, as well as a few
simple real world tests such as copying data back and forth.
The sequential character writes were cpu bound on the client in all
instances; the sequential block writes (and most sequential reads) were
limited by the gigabit network. The Ceph fs systems seem to do well on
seeks, but this did not translate directly into better performance in
the create/read/delete tests. It seems that RBD is roughly in a position
where it can replace iSCSI, but the Ceph fs performance needs some work
(or at least some heavy tuning on my part) in order to get it up to
speed.
It will take some digging to determine where the bottlenecks lie, but
in my quick assessment most of the server resources were only
moderately used, whether it be the monitors, mds, or osd devices. Even
the fast journal SSD disk only ever hit 30% utilization, and didn't help
boost performance significantly over the competitors who don't rely on
it.
Still, there's something to be said for this, as Ceph allows storage
to fail, be dynamically added, thin provisioned, rebalanced, snapshots,
and much more, with passable performance, all in pre-1.0 code. I
think Ceph has a big future in open source storage deployments, and I
look forward to it being a mature product that we can leverage to
provide dynamic, fault-tolerant network storage.
Since RBD gives you a block device it should be possible to re-export this block device via iSCSI just like you can re-export a Ceph filesystem via NFS.
iSCSI Multipath with RBD
iSCSI has some nice features like multipathing, with multipathing you
can create multiple IP-paths to your SAN thus creating redundancy in
your network. The one thing you have to make sure is that the data of
the LUN's is synchronized somehow between the targets (server), since the initiatior (client) will NOT do this.
Since RADOS in combination with the RADOS Block Driver gives you this, you can create a High Available multipath iSCSI setup.
Now, both targets should have this configuration and have /dev/rbd0, /dev/rbd1, /dev/rbd2 configured via the RADOS Block Driver interface.
We choose Type=blockio since we want Direct Block I/O, should we choose fileio, the kernel on the target will utilize it's file cache, which will then lead to cache-inconsistency between the targets. Choosing blockio will by-pass the kernel's cache, which is good in this case.
Switching to fileio could give you a performance boost, but then you will have to switch to a single target setup, but then you will loose the redundancy.
For a Multipath iSCSI setup you will need to specify a ScsiId for each lun, this enables dm-multipath on the initiator to find out which SCSI devices are the same and map them to one logical SCSI device.
When this is up and running you should be able to do a discovery
(send targets) on both targets and get your multipath setup running.
Since iSCSI is supported on Linux, Windows, Solaris, FreeBSD and
many other platforms, it's a easy and reliable way to get data from your
Ceph cluster shared with other platforms.
Someday there might be a driver for Windows or FreeBSD, but there
will always be situations (for example with SLA's) where you don't want
third-party drivers in your setup.
Building a iSCSI Target (Server) under Linux is fairly simple,
just install Enterprise iSCSI Target (IET) and you are ready. The
Initiator (Client) is simple to, just use Open-iSCSI and you are ready
to go, but how do you make this redundant?
When i first started using iSCSI i heard about the term "multipath", i
read that you could make a redundant IP link to your iSCSI Target with
multipath, but how?
Searching on the web didn't give me real practical anwsers. After
using multipath for about 2 years now, i thought, why don't i make a
blog post about it so other people can have redundant iSCSI to!
For this example i have a iSCSI Target with two IP's:
172.16.0.1/255.255.255.0
172.16.1.1/255.255.255.0
These IP's given to eth0 and eth1, via two switches the connectivity is given to my initiator with the IP's:
172.16.0.101/255.255.255.0
172.16.1.101/255.255.255.0
So there is a redundant network connection to the target, now we just have to start using this.
My target has as IQN: "iqn.2009-11-11.widodh.storage:iscsi-001"
I suppose you know how to configure IET and Open-iSCSI, so i'll just
skip the regular configuration. In this example my Target exports one
LUN of 10GB.
On the client (Ubuntu 9.04 (Jaunty)) you have to install:
open-iscsi
multipath-tools
And that's it, there is no configuration needed for multipath, this is all done dynamically.
Now we are going to discover the Target on both IP's and log on to it:
Yes, you will see a lot of SCSI errors in your dmesg, but since you have a redundant path that is nothing to be worried about.
Just keep in mind, use
"/dev/mapper/14945540000000000000000000100000099b2f8000f000000" as your
block device for whatever you intent to use it!
Multipath in combination with iSCSI is really great, a simple network
hickup will never get your services down and you can keep your network
like a basic Layer-2 network, no STP is needed, the redundant paths can
go over fully seperated links which decreases the chance for downtime!